Hammer & Anvil: Two Unbelievably Awesome New Web Development Tools
Riot is a small software company currently comprised of only five people. Out of nowhere, this team has dropped two web development apps for Mac users that have blown me away. This is an app category that, in my opinion, hasn’t received much true innovation in recent years and apparently the good people at Riot are out to change that, because their ideas are truly unique and incredibly useful.
Today we’ll take a brief look at both Hammer and Anvil to see what each does and how they can collectively improve your workflow, particularly if you’re a front end developer working with static sites.
Hammer
First up is Hammer, a real leap forward in the area of static site development. If you love the kind of stuff that PHP does, but either don’t know PHP or simply don’t want to mess with it in your small projects, you’ll love Hammer.

What Is It?
Let’s start by discussing what Hammer isn’t. It’s not an IDE or text editor. You don’t have to give up Sublime Text 2 to use it (which is awesome), it plugs right into your existing workflow and works along side your favorite web dev apps, whatever they may be.
Now, you ask again, what the heck is Hammer? In short, it’s a compiler. It serves as a sort of home base for your web design project. As you make changes, Hammer compiles your files. For instance, if you use Sass or CoffeeScript, they’ll automatically be compiled to CSS and JavaScript.
That’s It?
Nope. Hammer isn’t just another Codekit competitor. It adds to the concept of a compiler by providing special syntax that you can use in your work that governs the way your files are built.
What sort of special syntax you ask? How about HTML includes that allow you to automatically embed HTML documents into each other without PHP or a server environment? Or perhaps you’d like to use smart file paths that automatically locate specific assets, even when they’re moved? Would you like a side of HTML variables with that?
“Shut the front door” you say. Nay, I shall keep the door swung wide. Hammer does all of this and more. Let’s see how.
Getting Started with Hammer
After downloading and launching Hammer, this is what we see:

Here we have a nice, friendly startup window that urges us to either create a new project or drop in an existing project. I’m going to create a new project because there’s a lot of fancy stuff that happens that you should see.
Creating a New Project
Once I click the “Create New Project” folder, then choose a name and location for the project, Hammer gets to work and creates an impressive little directory of starter files.

Inside of the main project file, you’ll find an index.html file with three folders: assets, Build and includes. Each of these is pre-populated with starter files to help you get started.

The main area of interest here is the “Build” folder, this is the directory where your finished, static HTML site will be placed in all of its nicely compiled glory.
Hooking Up With Your Favorite Text Editor
As I mentioned before, Hammer is built to play nice with your current workflow. After you create your project, click the little app icon at the top right of the interface to select the editor that you’ll be using.
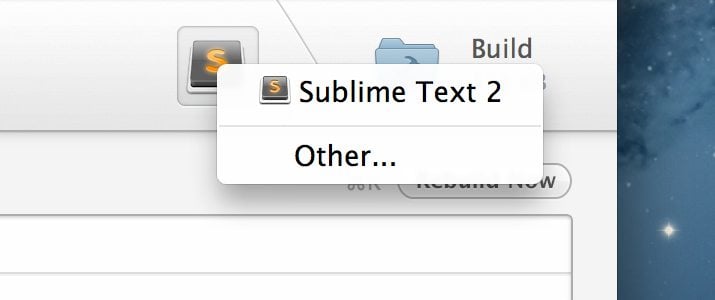
Now with the project selected in the left sidebar, hit Command-E and that project will open up in your selected app, Sublime Text 2 in my case.
Freaking Awesome Features
It’s difficult not to do a double take when you see Hammer’s features. They’re good. Really, really good. I’m talking voodoo that you never thought you’d be able to perform good. Let’s take a look at some of the best parts.
HTML Includes
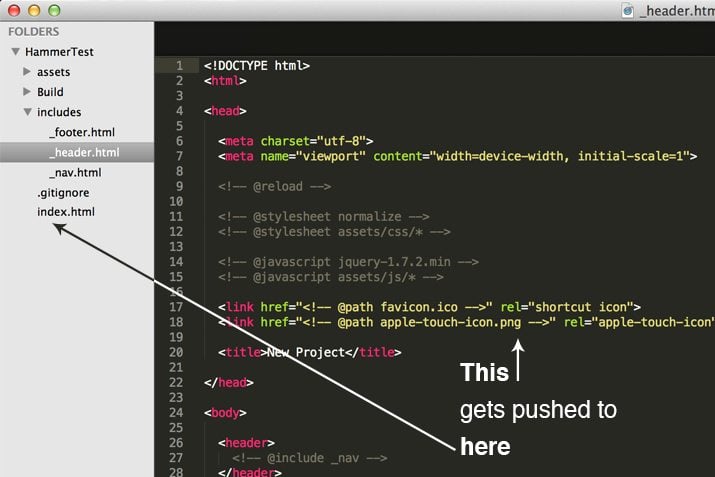
If we open up the auto-generated HTML file that came with our new project, this is what we see (this is the whole file):

This should be your reaction: “WTF? Where’s all the code? Wait, is that doing what I think it’s doing?” Yep.
Without any knowledge of PHP and without setting up any sort of local server environment, we can take advantage of the concept of module based development.
In case you’re so used to static sites that you have no idea what’s happening, let me break it down. Inside of the “includes” folder is a set of HTML files. For instance, take the _header.html file. We have one copy of this that can be inserted into as many pages as we want. If you place it into ten HTML files, then update the master header file, all ten other HTML files are updated on compile.
All you need to perform this impressive feat is a custom snippet that comes in the form of an HTML comment. Here are three examples:
<!-- @include _header -->
<!-- @include _body -->
<!-- @include _footer -->
The implications here should be blowing your mind. I really can’t express how much of a leap forward this represents for static sites.
Variables
“But wait!” you say. “You can’t use the same exact header in every file!” You’re a sharp one. At the very least, you’ll need to customize the title tag so that each page is different. So what now? Is Captain Hammer defeated?
Fear not, I’m about to show you how to use variables in your HTML. Instead of typing an actual title into your master HTML header file, you can simply create variable like so:
<title><!-- $title --></title>
Now when we run an include on our header file, we can customize that variable. We do this with a single line at the top of our destination HTML file.
<!-- $title Design Shack -->

<!-- @include _header -->

  <section>
    <!-- Write your HTML! -->
  </section>

<!-- @include _footer -->
The top line in this code snippet tells Hammer to replace the $title variable with “Design Shack”. Now I can have one included header file that is customized on a per-page basis. I told you this thing was awesome.
“Clever” Paths
Next up is clever paths. These are simple to grasp and super handy. Basically, you can ditch long file paths when you link to your various resources in favor of using the “@path” syntax.
<img src="<!-- @path slide1.jpg -->"/>
What’s happening here is pretty impressive. On compile, Hammer will actually search through your files and find what you’re looking for, then replace this snippet with the actual URL. And later when you decide to completely restructure your site, Hammer will still find the image and link it up properly, no matter where you’ve placed it.
Taking this idea of clever paths even further, Hammer simplifies the inclusion process for CSS and JavaScript files as well. To use this feature, implement the following syntax:
<!-- @stylesheet style -->
<!-- @javascript script -->
Hammer will then go in and locate your “style.css” and “script.js” files, then replace the lines above with the correct code in your output.
Other Goodies
These are my favorite features, but we’re not finished! Hammer has a bunch more great features that make it a worthwhile purchase.
- CoffeeScript & Sass – As I mentioned before, Hammer compiles both your Sass and CoffeeScript files for you. They’ve even included Bourbon so you have access to an excellent set of pre-built mixins.
- Automatic Reload – Just like LiveReload, you can set up Hamemr to refresh your browser every time a file is saved.
- Navigation Helpers – Hammer looks for hrefs that link to the current page (such as in a navigation menu) then applies a “current” class so you have a convenient style hook.
Publishing
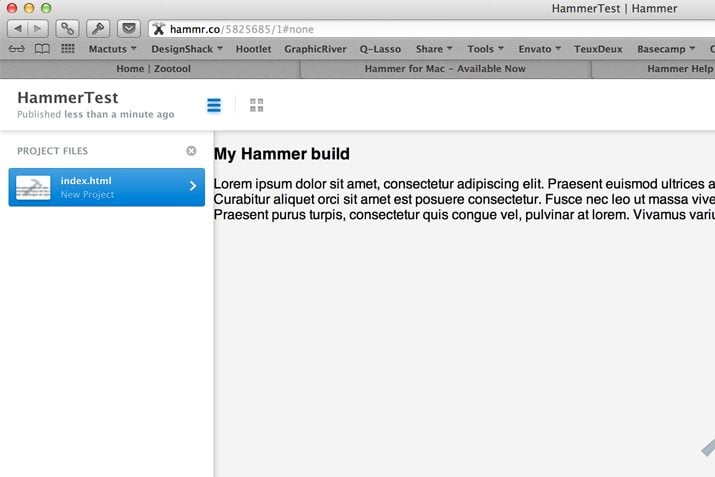
One last killer feature: Hammer includes a service component that allows you to click a single button to publish your site to a server where your clients can take a look:

This requires zero setup. Just click the “Publish” button and your files will be uploaded. A short URL will then be automatically placed into your clipboard for sharing.
Anvil
That about sums up Hammer, now let’s take a look at Anvil. Where Hammer is a complex beast loaded with unbelievably great features, Anvil is a simple, one trick pony… in a good way.
What Anvil does is simplify local site testing. The general idea here is that long local file URLs suck to work with, so when you toss a site folder inside of Anvil, it generates a simple “.dev” URL that you can use to access your site in a local browser.

When I toss my Hammer project into Anvil, it generates a nice short link: hammertest.dev. That’s all there is to it! I can now either click on the file right in Anvil or use the generated URL to view my project in the browser.
It’s so simple! Why has no one thought of this before? The best part about Anvil: it’s a completely free download.
Shaking Up Web Development
It’s a great time to be a web developer. It seems that every aspect of the web dev process is being critically examined and overhauled by independent, hardworking individuals who want to make this job easier for all of us.
Preprocessors are changing the way we work with CSS and JavaScript, projects like Light Table are aimed at completely rethinking the text editor as we know it, and here comes Riot to challenge our ideas of how static site development works.
This is the core reason that I love Hammer so much. Hardcore developers can do a lot of really great stuff by leveraging PHP, Rails and the like, while the lowly front end HTML and CSS guys can only drool over these concepts and features. Hammer seeks to change that and I applaud its developers for it.
Be sure to try out both Hammer and Anvil and let us know what you think. Hammer is $23.99 (it’s worth every penny and there’s a free trial) on the Mac App Store and Anvil is a free download.