A Complete Beginner’s Guide to Masking in Photoshop
Several years ago a friend of mine asked me to teach him how masks work in Photoshop. This is my incredibly late response.
We’ll go over the basics of what masks are, what they’re used for and how wielding them properly will take your Photoshop skills to an entirely new level.
What Is a Mask?
Layers are probably the single most important addition to Photoshop since the original version, but layer masks are a close second. I would posit that until you thoroughly understand how and why to use masks, you simply don’t understand the power of Photoshop.
The term “mask” isn’t immediately understandable to someone outside the realm of graphic design. At its simplest definition a mask is a way to apply something to a very specific portion of an image.
There are two primary types of masks: clipping masks and layer masks. These two tools are closely related in concept, but very different in application. Let’s start by discussing layers masks, which are generally what people are referring to when you hear them discuss Photoshop masking.
Layer Masks
A layer mask is something that you apply to a given layer to control the transparency of that layer. Where layer opacity controls the transparency of the entire layer at once, a mask gives you more precise controls over very specific areas. If you want the entire layer to be at 30%, you would lower the opacity, if you want just the left side of a layer to be at 30%, you would use a mask.
When you add a mask to a layer, it covers the entire thing with an invisible grayscale canvas. There are ways to see it that we’ll check out later but just know that as a general rule, applying a mask to a layer won’t cause any immediate visual differences unless you have an active selection at the time.
On this invisible canvas, you can paint white, black or any level of gray in-between. The color that you paint tells Photoshop how opaque to make the pixels at that point. White means 100% opacity and black means 0% opacity.
With this in mind, try to imagine what the mask below would do to a layer:
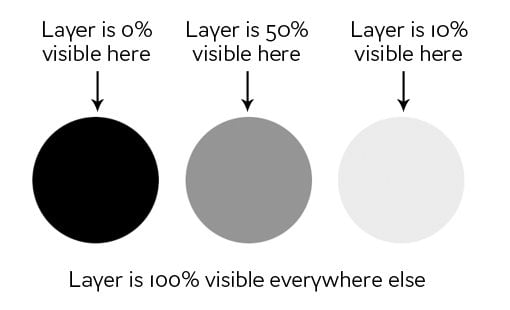
As you can see, if our mask was all white with the three circles shown above, we would have a completely visible layer where in all the white areas, and spots of transparency in the circles. If we apply this mask to a layer, this is the result:
Clipping Masks
Clipping masks are very similar to layer masks only they use one layer to determine the transparency of another. In this scenario, you stack two layers on top of each other with the bottom being the determining factor of the transparency of the top.
Instead of using black and white values though, clipping masks simply borrow transparency from the layers used to make them, namely the bottom layer. If the bottom layer has some areas that are opaque and some areas that are transparent, a clipping mask will apply these values to the top layer.
This one is hard to explain without an example, but becomes crystal clear when you see it in action. Let’s use the two layers shown below and say that our goal here is to cut or “clip” the wood layer to be in the shape of the letters. Notice that, at this point, the wood is the bottom layer and the text is the top layer.

To achieve the effect that we want, simply swap the position of the layers so that the wood is on the top, then go to the Layers menu at the top of your screen and select “Create Clipping Mask” (Command-Option-G). Voila, we now have the effect we were going for. Where the text layer was opaque, the wood layer is now opaque and where the text layer was transparent, the wood layer is now transparent.
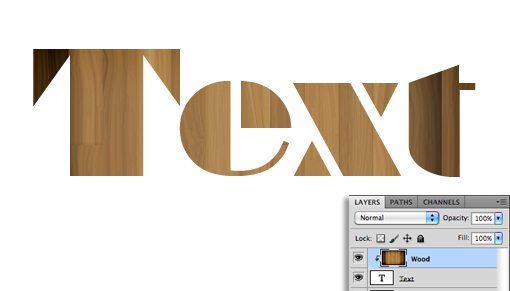
There’s some really interesting functionality here. You can still position and make changes to each of the two layers independently. By dragging around the wood layer, you move the position of the texture inside the bounds of the letters while the letters themselves stay stationary.
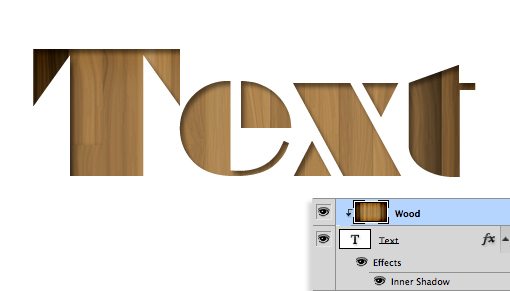
Also, you can apply layer effects to the compilation via the bottom layer. For instance, here’s what happens if we select the text layer and add an Inner Shadow.
Clipping masks fun, functional and underrated, but the truth is that layer masks are far more common in every day use. The information above should be enough to get you off and running with clipping masks so from here on out we’ll focus purely on layer mask functionality.
How Do I Make a Layer Mask?
Now that we have a strong grasp of exactly what masks are and how the two different types of masks differ, let’s see how to create and work with a layer mask.
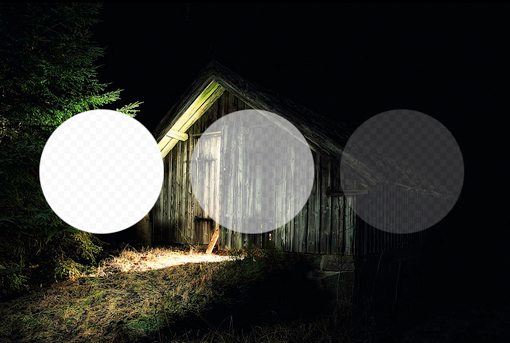
The first thing we need is two layers. I grabbed the two images below from photographers Adrian Durlea and Erik Soderstrom. The shack image is on the bottom and the fire is on the top.
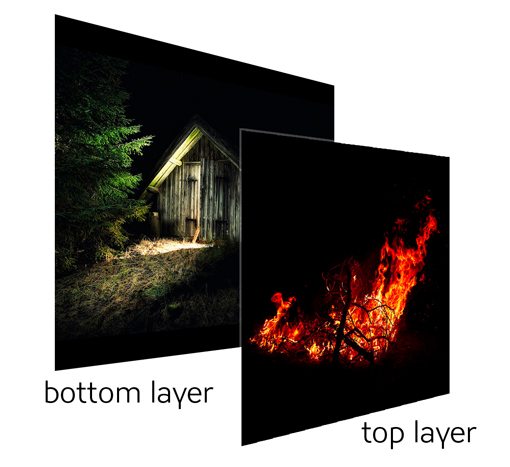
The general idea here is to take some, not all, of the fire and apply it to the shack. The first step is to stack the two images as we see above and set the fire layer’s blending mode to Screen. This will make all of the black pixels transparent, which blends the two images together nicely.
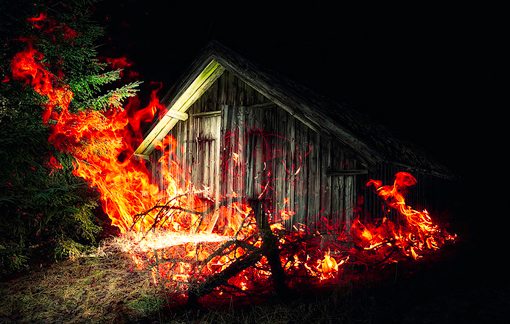
With that one change, this is already a pretty decent image! Let’s say though that we want to only have fire near the door of the shack. To accomplish this, we’ll need to add a mask to the fire layer. Select the fire layer and click the mask icon shown in the image below.
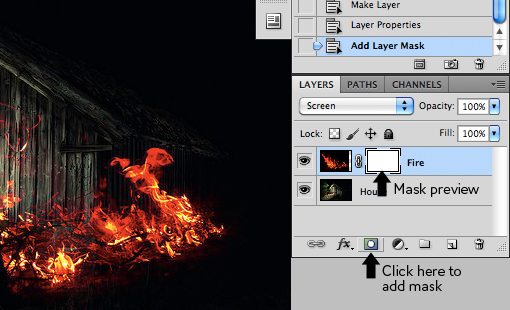
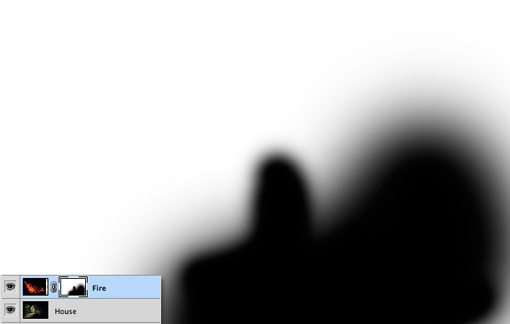
Now, with the mask selected in the layers palette, we grab a soft, black brush and paint out the portions of the fire that we don’t want to see. As we do this, the fire begins to disappear. To bring it back, we simply paint white.
As you can see in the image below, with just a little painting, our fire is now much more centralized to the portion of the image that’s already lit up and therefore looks decently natural.
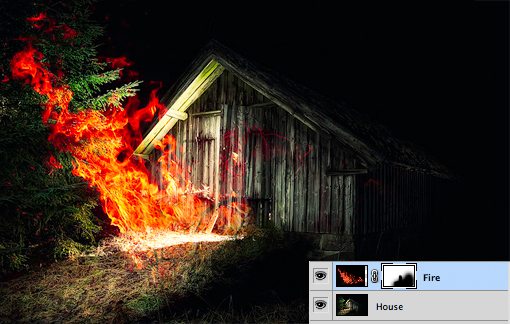
To see the actual mask, Option-Click (Alt-Click on a PC) on the little mask preview in the layers palette (Shift-click to hide the mask completely). After painting out some of our fire, this brings up the following:
Notice that we’re not just constrained to hard edges. The beauty of masks is that you can do anything you want with them as long as you can pull it off in values of gray. This means you can paint, clone, create and fill selections, copy and paste, and all kinds of other actions you perform on the main canvas.
Why Not Just Erase?
Upon first learning how to use masks, most rookies think the same thing: “I can already do all of this with the eraser tool.” Wrong! In fact, as far as I’m concerned, once you learn to mask, you should literally never pick up the eraser tool again because it tends to be so destructive.
What do I mean by destructive? Think about what happens when you use the eraser tool: it erases pixels. Mind you, it doesn’t hide them for a while until you want them back, it “destroys” the pixels. The changes that you make by deleting portions of a layer are permanent and can’t exactly be tweaked later.
This is simply a horrible way to work. With every new iteration of Photoshop, Adobe gives us more and more ways to make non-destructive edits, meaning those that don’t truly alter the original pixel data. For instance, Filters used to be a permanent and destructive change, if you blurred a layer, it was stuck that way! Now, with Smart Filters, you can always go back and adjust or even delete the blur.
This same concept gave birth to masks many years ago. With a mask, you not only have the ability to make remarkably detailed decisions about the transparency of a layer or group of layers, even better, you have the freedom to go back and refine or scrap those changes at any time. If I had erased my fire in the example above, it would be gone forever and bringing it back would involve importing the layer all over again. However, because I used a mask, all I have to do is fill that mask with white and immediately all of my fire detail returns.
To use the metaphor of an actual mask, imagine that you want to change your appearance for Halloween. You have two options: the first is to undergo plastic surgery to permanently change your face to look like that of a scary creature and the second is to wear a mask. In this scenario, the eraser tool is plastic surgery. It’s simply a bad choice when you’re not sure that you want the changes to be permanent. Go with the mask instead.
Advanced Masking Techniques
The information above is an absolute beginner’s guide to masks. Odds are, if you’ve been using Photoshop for a while, not a single piece of this was news to you. In fact, you may be thinking that masks are so incredibly simple that they barely merit conversation.
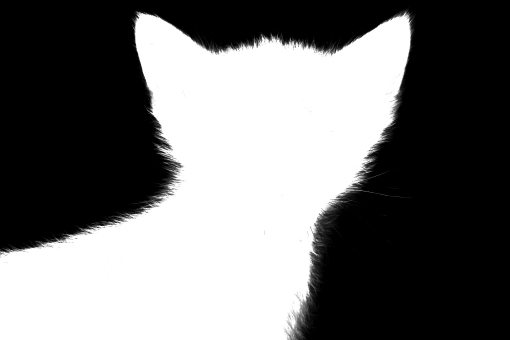
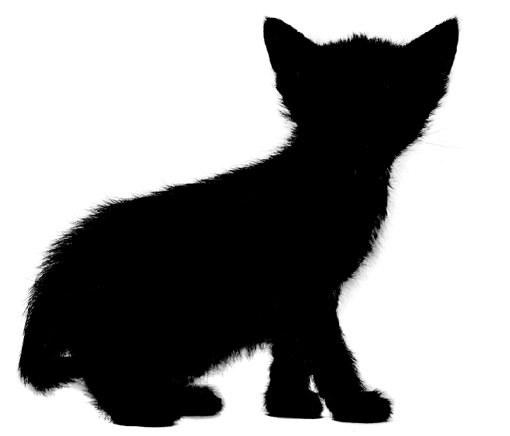
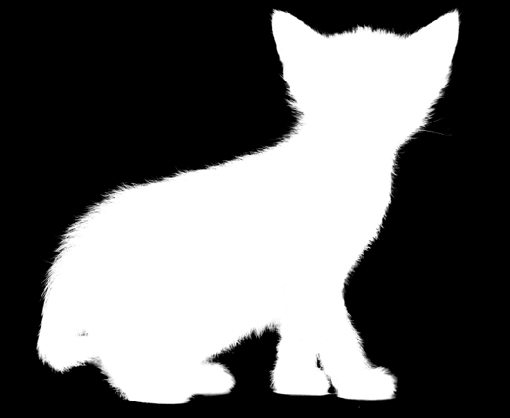
However, masking techniques go from simple to wickedly complex really fast. It’s easy enough to paint some broad strokes to erase large portions of an image, but what if you want to do something more complex? For instance, let’s say we want to take the cat below off of its white background.

Furry animals make particularly difficult masking subjects. All of that fine hair detail means making an accurate selection will be time consuming. The Magic Wand or even the Pen Tool are of no use to us here. So how do the pros start with the image above and create a mask like the one below?
If you’re ready to find out, keep reading as we undertake this feat!
Change the Channel
The good news about the cat image is that there is plenty of contrast to work with. The key to making a good mask is finding contrast and knowing how to pull it out. Here we have a fairly dark cat on a bright white background, which means all we have to do is figure out how to leverage our good fortune and convert the contrast already present into a suitable mask.
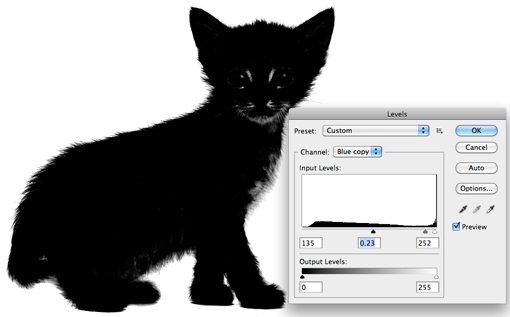
The first step in a project like this is to jump over to the Channels Palette and look for the channel with the most contrast. So in our case, we want the channel with the darkest cat and the brightest background, which turns out to be the blue channel.

Make a copy of the blue channel, select it and hit Command-L to bring up a Levels Adjustment. Darken the shadows and the midtones so that there is a crazy amount of contrast like in the image below. Be careful to no go too far with this adjustment. You’ll want to zoom in and watch the hair detail on the fringes of the fur to make sure you’re not clipping too much. It doesn’t have to be perfectly black and white at this point, some dark grays are acceptable.
At this point you encounter one of the trickiest steps of the entire process. The goal is to get as much of the cat as closest to black as you can. This is easy for the face potions and other random spots near the center, just grab a black brush and fill them in. But what about the edge of the hair?
It turns out one of the best ways to handle this task is to use a couple of unlikely candidates: the Dodge and Burn Tools. The reason these work so well is that they can accurately target certain ranges of gray extremely accurately. I set the Dodge Tool to target the highlights and the Burn Tool to target the shadows, grab a medium size soft brush and make my way around the edges of the image, burning shadows and dodging highlights until I like the level of detail that I’m seeing.
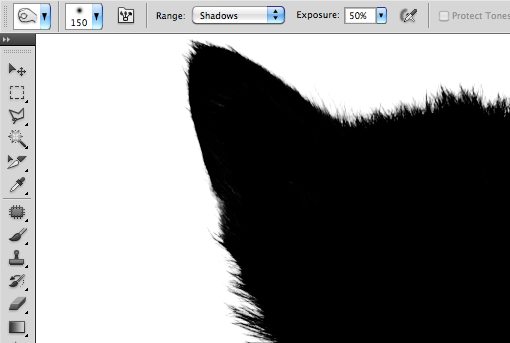
This may sound like a time-intensive task, and it can be for some images, but in truth the Dodge and Burn Tools feel like magic when you’re using them and take much of the work out. I was able to come up with a great looking silhouette in only a minute or two.
Once you’re done here, hit Command-Shift-I to inverse the channel so that the cat is white and the background is black like in the image below. Remember that, in masking, white is opaque and black is transparent.
Converting the Channel to a Mask
Now that we have a channel that accurately represents what we want from a mask, how do we convert it? There are a few ways to do this but the easiest is just to Command-click on the channel to load a selection. With a selection loaded, return to your cat layer and click the New Mask button. That’s all there is to it!

Defringing the Mask
As you can see, despite a super detailed mask, we still have some white fringing occurring around the edges. Getting rid of this can literally take hours of tedious work if you don’t know what you’re doing. For starters, we can use the fantastic new Masks Palette in conjunction with Refine Edge to make some live adjustments to our mask.
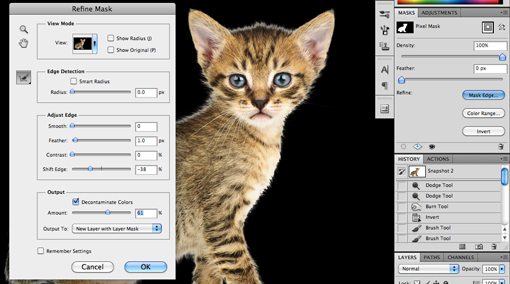
Utilizing these tools properly takes practice. I won’t cover them closely now because it would take so much time but I encourage you to dig in and play with all of the controls to get a feel for what they do. Often, you can patch up a rough edge in seconds with these sliders, but with our cat project I wasn’t really getting any results that I liked so I cancelled out this operation altogether.
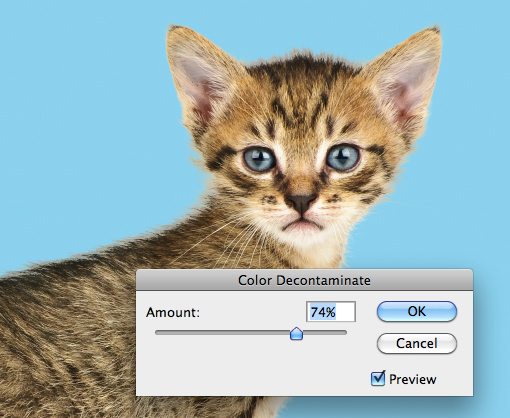
Instead, I went to the Layer menu at the top of the screen and selected Matting>Color Decontaminate. This is an almost hidden command that has the ability to yield some amazing results. As you can see in the image below, it went a long way toward reducing our halo. Note that this command is actually destructive so you should always duplicate your layer before using it.
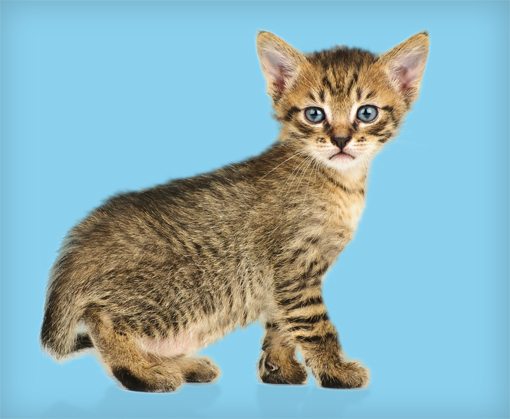
From here, the last trick I use is to look for problematic areas and actually run the clone brush over the fringes. The mask keeps everything looking nice and cloning replaces unnatural colors with those from the actual fur of the cat in other places. Compare the back and head of the cat in the image below to that above to see the improvement.

Finishing Up
From here it becomes a factor of how much time you want to spend refining your result. With complicated masks like these there is always room for improvement but you’ll find that the point of diminishing returns on your time spent becomes easier and easier to spot as your skill level improves.
The technique we just discussed is just to give you a taste of how advanced masking can become. There are a ton of different types of images to mask and therefore a million different tricks and techniques to figure out along the way which can be mixed and matched on a per-project basis. Practice makes perfect, just be bold and never become intimidated by a masking job that seems too complex. Think through the process one step at a time and find ways to pull out the detail you need.
Conclusion
To sum up, there are two primary types of masks in Photoshop: layer masks and clipping masks. Layer masks use values of gray to assign levels of transparency to specific portions of a layer or group of layers while clipping masks use the transparency of one layer to define that of a different layer or group of layers.
Also, while masking in simple in concept, the actual art takes considerable time, education and practice to master. Leave a comment below and let us know if you learned anything from the information above. Also be sure to share any unique masking techniques or tricks you might have!
Photo Credits: Adrian Durlea, Erik Soderstrom, and Sergiu Bacioiu.