How to Make Slicing Suck Less: Tips and Tricks for Slicing a PSD
I have a dirty little secret, I hate slicing Photoshop files. By that I don’t mean that I hate turning PSD comps into websites, I mean that I hate Photoshop’s slicing tools. The whole process makes my PSD look busy, cluttered and overly complicated so I usually skip it altogether and instead opt to manually crop and save out images individually as needed.
In order to fight this tendency and attempt to see the true usefulness of Photoshop’s slicing tools, I embarked on a mission to learn all the intricacies of how slicing works. Below is a collection of tips and tricks that resulted from this journey. Hopefully, you’ll learn a thing or two you never knew!
There are Three Types of Slices in Photoshop
Three types of slices!? This was one of the most interesting and surprising things that I learned. Having not really experimented with the slicing features too much, I just figured there was only one way to go about it. I was wrong.
The three different kinds of slices are User Slices, Auto Slices and Layer Based Slices. To begin, let’s talk about the two you’re probably familiar with: User Slices and Auto Slices. These are very closely related, in fact, one creates the other.
As you know, to slice a PSD you start by grabbing the Slice Tool (C) and drawing a box around the area that you want to export as a standalone image. By adding slices to all the areas of your comp that you want to do this to, you can quickly and easily optimize and export several images at once.
When you perform a slice, you should get something like the result seen below.

What I’ve done here is draw a box around the logo at the top of the page. This one action created both a User Slice and several Auto Slices. When you create a slice, Photoshop assumes that your end goal is to turn the entire PSD into a series of slices. I personally think this assumption is quite annoying, and we’ll discuss later how to get around it. For now, just know that because of this assumption, Photoshop extends the edges of your slice all the way across the PSD, thereby creating several other sections automatically. This is illustrated in the image above.
Tricks for Working with User and Auto Slices
While we’re on the topic of User and Auto Slices, let’s go over some of the obvious and not-so-obvious features so that you can really get a feel for what tools and options you have at your disposal.
Moving and Editing Slices
Once you’ve made a slice, you should see controls similar to that for a Free Transform that will allow you to move and edit it. You can also use the Slice Select Tool to ensure that you’re only editing current slices and not creating new ones. This tool is found under the Slice Tool in the fly out menu.

Converting Auto Slices to User Slices
Throughout the entire slicing process, Auto Slices are continually created and updated and they stay distinct from user slices. Later, we’ll look at how to export them as files or ignore them when exporting, but for now let’s take a look at how to turn an Auto Slice into a User Slice.
The process is extremely simple. First, you have to select the auto Slice using the Slice Select Tool. Next, select the Auto Slice that you want to convert and hit the “Promote” button near the top.

That’s it! Now the Auto Slice should change color, indicating that it is now a User Slice. Now you’ll have greater control over its size and how it exports.
Auto-Dividing Slices
When you have a series of objects that are distributed horizontally, vertically or even in a grid, you don’t have to take the time to go through and make a slice around each individual unit. Instead, you can make one slice that covers all of the objects and tell Photoshop to do the rest.
To do this, first make your big slice by drawing a box around all of the objects. Then, with the Slice Select Tool enabled, click the “Divide” button at the top of the page.

This should bring up the “Divide Slice” dialog box shown above. Using this window you can quickly insert extra vertical and horizontal slices. If they don’t align right, you can adjust them manually after hitting the “OK button.”
Slices from Guides
Many of you are probably much more comfortable working with guides than slices inside of Photoshop. The reality is that they both work very similar, but the guides system admittedly feels a bit smoother.
If this is how you roll, this fits perfectly into an easy workflow for creating slices. Simply drag out guides to slice up your PSD and ignore the slicing tools altogether. Then, once you’re all finished, select the Slice Tool and hit the “Slices from Guides” button at the top.

Naming Slices
One of the annoying things that will bug you the first time you work with slices is that when you export them, the resulting files all come up with big ugly names that aren’t at all meaningful. To fix this, you need to make sure you’ve gone in and named each slice appropriately. Whatever name you assign will then be carried over as the file name upon export.
To name a slice, simply double-click on its contents with the Slice Tool selected. This will bring up the dialog below.

Notice that you have several options here, including setting the color for the slice, manually inputting the dimensions and assigning a name. There’s also a bunch of HTML stuff like URL, Target, etc. It turns out, Photoshop can take your sliced PSD and output it as a web page. Some bash this functionality because the default settings create a table-based layout, however you can switch these to utilize CSS.
Now, don’t get too excited. Even with the CSS options selected, Photoshop is still pretty rotten at building a website for you. You’re much better off doing it by hand or at least taking it over to Dreamweaver, which means you should ignore all these other options completely.
Layer Based Slices and Why They’re Better
One of the main features that made slicing suck a lot less for me is Layer Based Slices. These are a particular brand of User Slices that are superior in several ways.
As the name implies, these slices are not based on a box that you draw manually but instead automatically adhere to a layer’s bounds. To create a Layer Based Slice, select a layer in the Layers Palette, then go to the menu and select Layer>New Layer Based Slice. Note that this even works if you have multiple layers selected, each layer will simply be turned into its own slice!

Obviously, in order for this to work properly, you have to be really be good about how you structure your layers. You should be building your mockups as fully layered and organized files anyway so this shouldn’t be a problem.
The Advantage
One of the main reasons that normal slices are so lame is that it creates a lot of extra work if you want to go back and tweak your designs. After you shuffle the artwork around, you have to then go back and move all your slices to align with the new layout. This annoyance is why I always just manually save out the individual pieces through cropping.
However, Layer Based Slices are actually quite intelligent. When you move around your layers, your slices automatically follow. If you add an effect that changes the bounds, such as an Outer Glow, the slice expands to include it. If you transform the layer to 30% of its original size, again the slice updates automatically!

Obviously, there’s a clear argument here for using Layer Based Slices whenever possible as it saves you an incredible amount of time in the inevitable re-design stage.
Killing the Clutter
Another of my biggest annoyances with slicing is that it can create a really cluttered looking PSD. This is mostly do to the Auto Slicing side effect.
As an example, take a look at the image below (it’s a bit over-simplified here but you get the point). Here I only really only wanted to create three slices, but Photoshop has automatically gone in and turned it into twelve slices!

I don’t know about you, but I don’t build webpages as one big collection of images all crammed together. So I simply don’t want all these extra slices! I’m not going to export these areas into images, so all they’re doing is adding noise to my interface. When I see a document like this, the slices cease to be a meaningful tool for me.
To fix this, we can grab the Slice Select Tool and hit the “Hide Auto Slices” button at the top of the screen. This does exactly what the name implies, ditches all of those nasty Auto Slices from view.
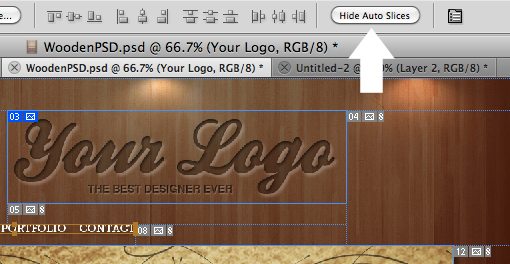
Look how much simpler our document becomes! The few slices that we used are clearly identifiable and therefore retain their usefulness. In my opinion, this method of viewing your slices is greatly preferred. This is one of those cases where Photoshop simply tries too hard to predict my preferred workflow and ends up overdoing the features.

Exporting Slices
This is where the usefulness of slicing really comes into play. Without slicing, you have to save out each portion of your comp one at a time. The workflow would be something like the following: make a selection, crop, optimize in Save for Web, save, undo crop, and repeat. That’s a lot of unnecessary steps! Let’s see how it works with slicing.
After you’ve finally figured out all the ins and outs of slicing and have your PSD ready to go, it’s time to go to the File menu and select “Save for Web and Devices.” You’re probably familiar with this dialog already but it’s a bit different when you have slices in your document.

If you have any slices, the preview of your document in this window shows all of them (unfortunately, this includes those annoying Auto Slices). From here you can simply click to select each slice and optimize the settings for each individually. This includes file type, quality, etc. So in one session, you can set up an export of three JPGs and a PNG, each at a quality that you deem appropriate.
Once you’ve adjusted everything to your liking, hit the “Save” button. A dialog should pop up that allows you to choose a folder to place all of the images in. Remember that we already set up the naming convention so just leave that as is. The key here is to make sure that you’re only exporting either “All User Slices” or “Selected Slices”.

Depending on your desired workflow, either of these options works great. The default option is simply “All Slices”, which will include not only your User and Layer Based Slices, but also the completely useless Auto Slices that you’ll just have to throw in away anyway. Save yourself the trouble and ditch these here before the actual save takes place.
Conclusion
We went over a lot of pretty technical Photoshop stuff today so I’ll try to sum it up nicely. First, slicing a PSD can really feel like a clunky process if you don’t know what you’re doing. Make sure you really look around in Photoshop and experiment with the tips above to ensure that you’re making the most of the tools available to you.
Secondly, remember that there are three types of slices: Auto Slices, User Slices and Layer Based Slices. Auto Slices are pretty lame and are more of an unfortunate side effect to slicing than a helpful feature. You don’t have to agree with me on this, but if you do, hide them so they’re not so distracting. User Slices are simply those that you intentionally create. You can adjust them with the Slice Select Tool and name them by double-clicking on the contents. Layer Based Slices are just like User Slices, only they are much smarter because they automatically adhere to a given layer’s bounds. You can move, resize and add effects to a layer and the slice will continually update on its own.
Finally, when exporting a document with slices, choose the Save for Web command and optimize each slice as its own file. Also make sure to only export the User Slices or Selected Slices, otherwise all of the Auto Slices created by Photoshop will fill up you images folder.
This is probably way more than you ever wanted to know about slicing in Photoshop, but hopefully this has helped you spot the inefficiencies in the system so that you can adjust and still take advantage of this useful set of tools without being hampered by its awkwardness.
Leave a comment below and tell us how you slice a PSD. The workflow that I’ve set up here is just one of many possible solutions and I’m anxious to hear and learn from yours!