Ratchet: Prototype iPhone Apps on the Fly in HTML
Ratchet is an awesome new framework that allows you to quickly and easily create prototype iPhone app layouts using only HTML, CSS and JavaScript. Simply create a container div in your HTML, toss in a few items with preset classes and you’re ready to go.
Follow along as we jump into Ratchet to see how it works. We’ll kick the tires, try out some features and decide whether or not it’s worth a download. (Spoiler alert: it is.)
What is Ratchet?
Ratchet is very simple in concept. It’s a UI framework powered primarily by CSS (and a little JavaScript) that is implemented through simple HTML. It’s actually very similar to Twitter Bootstrap, only it’s specifically designed to look like the native iPhone interface.
Can I Really Do This?
Ratchet is not some super complicated framework only for high level developers. You can get up and running with it in mere minutes. It requires zero knowledge of any iOS programming and really only the tiniest bit of JavaScript.
To see how it works, let’s build a sample page from scratch.
Getting Started
To begin, head over to the Ratchet GitHub page and grab the free download. Inside of that download you’ll find a starting template, crack this open in your favorite text editor.
In the head portion of the HTML, there’s a ton of stuff. We’ll leave this all alone for our purposes as it provides a decent testing setup. Feel free to tweak the touch icons, page title, etc. as you see fit.
From here, all we need to do is scroll through the documentation, grabbing elements that we want and tossing them into our HTML. It really is that easy!
Title Bar
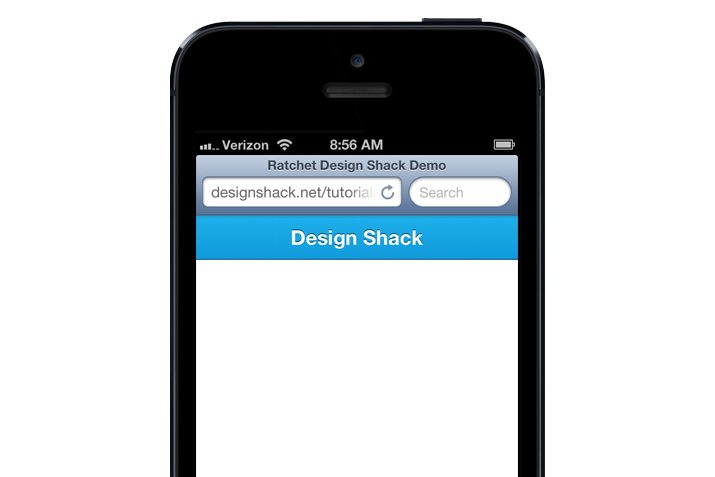
The first thing that we’re going to include is a blue title bar that sits at the top of the screen. Doing this is easy. To begin, place the following code inside of the body tag in your HTML.
<header class="bar-title">
</header>
This header element serves as the container for our title bar. Now let’s toss in an h1 with a “title” class assigned.
<header class="bar-title">
  <h1 class="title">Design Shack</h1>
</header>
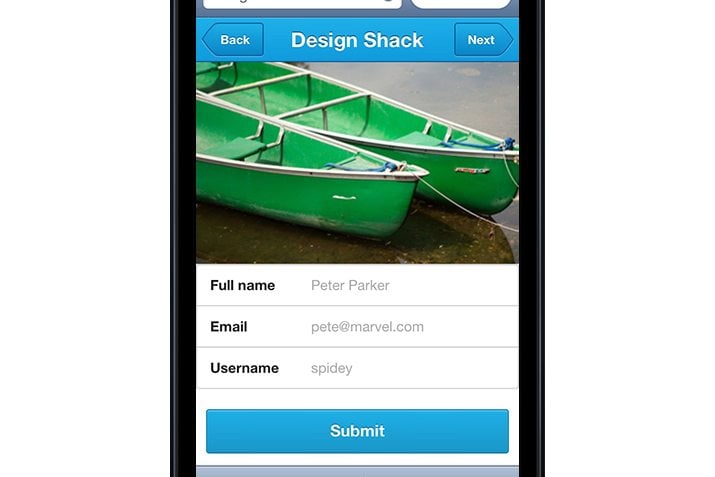
Now if we load up this page on an iPhone, we’ll see a nice iOS style title bar at the top of the page. Pretty dang simple, right?
Let’s make that bar a little more interesting shall we? Using a anchor tag with the “button-prev” and “button-next” classes, we can take our title bar from purely aesthetic to functional.
<header class="bar-title">
  <a href="#" class="button-prev">Back</a>
  <h1 class="title">Design Shack</h1>
  <a href="#" class="button-next">Next</a>
</header>
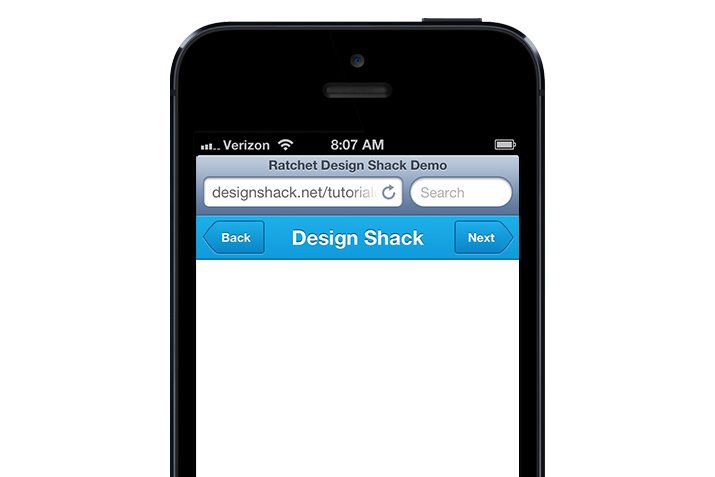
Once again, we’re seeing the power of this framework at work. iOS does not style these HTML elements like this by default, Ratchet is doing all the heavy lifting here.
Slider
The step above pretty much outlines the basic process of prototyping your app or web page. Scroll through the documentation, find an element that you want to use, then paste in and tweak the code. Next, we’ll include something a little more impressive: an image slider.
The Content Div
Before we launch into the slider, there’s something else that we need to include. Aside from the title bar, everything in Ratchet needs to be thrown inside of a div with a class of “content”.
<div class="content">
</div>
You can create multiple content divs or you can just toss everything you need into one. Later one we’ll see how to use a padded content div to add a little separation between your content and the screen edge.
Slider Code
The Ratchet slider is made up of a “slider” div, which contains an unordered list. Again, make sure all of this goes inside your content div.
<div class="content">
  <div class="slider">
    <ul>
    </ul>
  </div>
</div>
Each list item here becomes a slide. You can include an image and a span for a text overlay.
<div class="content">
  <div class="slider">
    <ul>
      <li>
        <img src="slide1.jpg">
        <span class="slide-text">Slide me</span>
      </li>
      <li><img src="slide2.jpg"></li>
      <li><img src="slide3.jpg"></li>
    </ul>
  </div>
</div>
That’s all there is to it. If we take a look at our page, we should now see a full width slider just under the title bar.
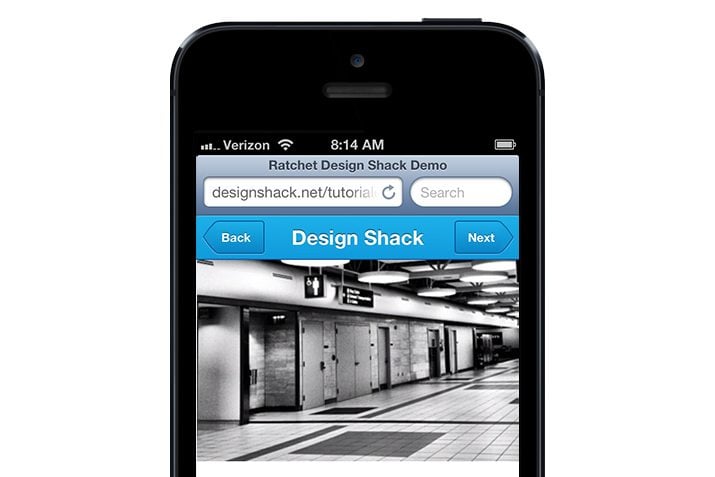
Granted that you left in the JavaScript files that came with the template, this slider should be perfectly functional. On your iPhone, just swipe your finger to the left to see the next slide.

Form
Sliders are always fun, but you know what sucks to code up and style? Forms. They can be a real pain if you don’t know what you’re doing. Fear not though, Ratchet has you covered here as well. Let’s add a basic form to this page.
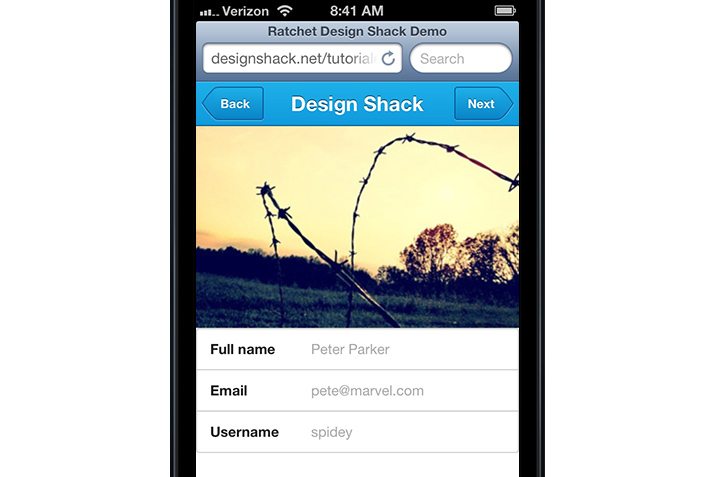
To code up a form, pull out the HTML5 “form” element. Inside of that, create a div with “input-group” assigned as a class.
<form>
  <div class="input-group">
  </div>
</form>
This will serve as a single item in our form. Every other item will need its own “input-group” div. Inside the input group, toss in a label and a text field with some placeholder text.
<form>
  <div class="input-group">
    <div class="input-row">
      <label>Full name</label>
      <input type="text" placeholder="Peter Parker">
    </div>
  </div>
</form>
This will give us a field for the user to type in a name. Now let’s repeat this process and toss in two more fields: email and username.
<form>
  <div class="input-group">
    <div class="input-row">
      <label>Full name</label>
      <input type="text" placeholder="Peter Parker">
    </div>
    <div class="input-row">
      <label>Email</label>
      <input type="email" placeholder="[email protected]">
    </div>
    <div class="input-row">
      <label>Username</label>
      <input type="text" placeholder="spidey">
    </div>
  </div>
</form>
Ratchet will kick in and handle all of the complicated form styling for us, which gives us a nice, beautiful form without any serious effort.
Button
Our app page is looking pretty good! By now you should have a pretty solid idea of how to pick up and run with Ratchet on your own, so let’s finish this sucker off with one more element: a submit button.
Ratchet has these nice big buttons, but by default, they extend to the full width of the container, which doesn’t look right in this example. As a result, we’ll want to implement the “content-padded” class that I mentioned before.
Insert this div right at the end of your form like so:
<form>
  <div class="input-group">
    <div class="input-row">
      <label>Full name</label>
      <input type="text" placeholder="Peter Parker">
    </div>
    <div class="input-row">
      <label>Email</label>
      <input type="email" placeholder="[email protected]">
    </div>
    <div class="input-row">
      <label>Username</label>
      <input type="text" placeholder="spidey">
    </div>
  </div>

  <div class="content-padded">
  </div>

</form>
This will give us a few pixels of padding so that our button has some room to breathe. Now we just need to place an anchor tag inside with two classes: button-main and button-block.
<div class="content-padded">
  <a class="button-main button-block">Submit</a>
</div>
With that, our page is all finished! It’s a pretty sharp looking prototype considering all we did was copy, paste and customize a few snippets of HTML!
Live Demo: Click here to launch (should be viewed on a mobile device).
Lots More!
Keep in mind that we’ve barely scratched the surface of what’s included with Ratchet. There are lots more button styles, title bar options, other forms; enough to really get off to a nice start with a working prototype.
Linking Pages
No working iPhone app prototype would be worth its salt without that famous little iPhone page transition. Fortunately, the included Push.js file takes care of this for you when you link pages together. You can even set up different transitions: without writing any JavaScript.
<a href="two.html" data-transition="fade">One</a>
<a href="two.html" data-transition="slide-in">Two</a>
What Do I Think of Ratchet?
Three words: Ratchet is awesome. I’d definitely like to see some more thorough documentation and even some more elements, but that’s merely me wanting more of a good thing.
I had almost zero trouble getting up and running with this framework. Within minutes of your first download, you’re building great working prototypes. What more could you ask?
The one issue that I ran into is with slider captions. I’m not sure what I’m doing wrong, but I can’t get the text to appear over the slide if I simply follow the instructions on the Ratchet site (a few manual overrides fixes the issues). Other than that, everything works perfectly.
Go Try It!
Now that you’ve seen what Ratchet is, what it can do and heard my opinion on it, go grab your free download. Play around with it for a few minutes then leave a comment below and let us know what you think. Have you found any other similar frameworks? How do they compare to Ratchet?