5 Simple Steps to Stunning Portraits in Photoshop
Today’s article points out a harsh but true reality: just because you know how to use Photoshop for design work doesn’t mean you know how to edit photos. Fortunately, we’ve got you covered.
Follow along as we show you five simple and lightning fast steps you can take to transform your plain, boring portraits to stunning images that look straight out of a professional photographer’s portfolio. Along the way you’ll learn several important tips such as how to properly sharpen an image and how to draw the viewer’s attention to where you want it to go.
A Different Kind of Workflow
Web designers generally know their way around Photoshop pretty well. Odds are you’ve been using it for years and could write a few tutorials on it yourself.
After years of being a designer, I found myself in this very position. From a design perspective, I was a Photoshop whiz who knew the application inside and out. However, when I began to pursue photography on a professional level, I realized that the skill set required for this task was a fundamentally different one.
A Tale of Two Photoshops
There are a million different reasons to use Photoshop, but two prominent uses come to mind. The first is how the crowd reading this blog generally uses it. We lay out websites, build typographic art, and create fancy looking UI elements from scratch. In short, we see Photoshop as a blank canvas on which we can create something.
On the other side, the very name of the application, “Photoshop,” indicates what could be argued as its original primary use: photo-editing. It’s rare that you’ll find a professional photographer these days who is satisfied with what comes out of the camera, they almost all take their images right into Photoshop, Lightroom (alternatively Aperture) or some combination of the two.
Let’s step away from our typical discussion of how to use Photoshop as a designer and take a brief look at a dead simple photography workflow that will help you improve the photographs that you incorporate into your work.
Step 1: Raw Exposure Adjustments
The first step we’re going to take is to open up your raw image, straight out of the camera, in Photoshop. When working with a photo shoot with thousands of photos, I perform this step in Lightroom. However, with a single image, it’s fine to just go right into Photoshop as it gives you a very similar set of raw editing tools.
If you’re using images provided by someone else, you may not have the luxury of working with raw files. However, if you’re using images that you shoot yourself, make sure that you shoot in raw.
There’s only one downside to shooting in raw: file size. Raw files tend to be huge compared to their JPG equivalents. However, from an editing standpoint, raw files give you so much more freedom to manipulate and improve the image. If you’re skeptical, try shooting the same photo in RAW and in JPG, then adjust the white balance for each and you’ll immediately see the benefits of raw.
The Raw Dialog
When you drag a raw image to Photoshop, you’ll see a special dialog specifically for working with raw images. This contains a strip of tools along the top, a set of sliders along the right and shows a live, automatically updating preview of the image in the center.
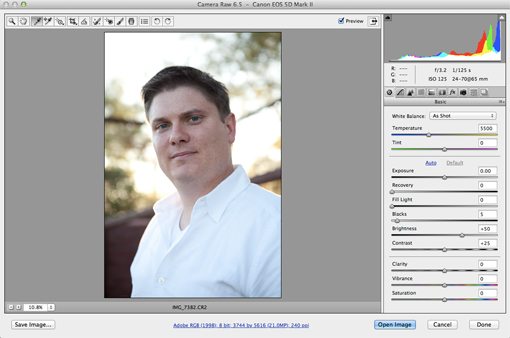
Adjusting Exposure
The first thing we want to do in this dialog is fix our exposure. As you can see, I took this shot a little on the dark side so we’ll need to brighten it up a bit. Here are the Adjustments that I made:

As you can see, the main thing that I did was increase the brightness (not the exposure). I also added a tiny bit of fill light and upped the recovery to help reign in the highlights on the subject’s white shirt.
The result is a much brighter image that looks a lot less like the subject was standing in a shadow.
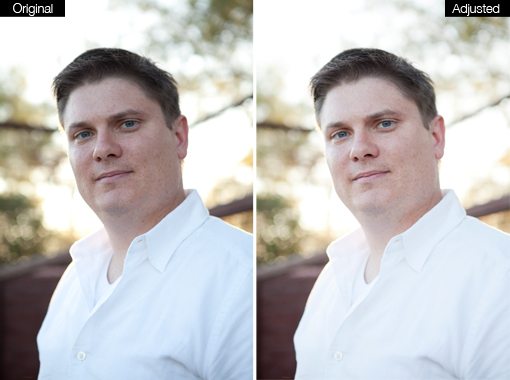
Step 2: White Balance
The other step that I want to take in this dialog is to adjust the white balance. One of the primary factors that sets a professional’s photo apart from an amateur’s is proper white balance. An image with poor white balance has ugly, unrealistic colors that make the image look either too cool or too warm.
I’d like this image to be just a bit warmer so I take the temperature slider and move it to the right just a pinch. The result may seem subtle, but in the long run it’ll be a really important change.

Adjusting the white balance can be tricky at first, but you’ll get the hang of it quickly after reading a good primer on the topic. I highly recommend checking out Cambridge in Colour’s “Understanding White Balance” article.
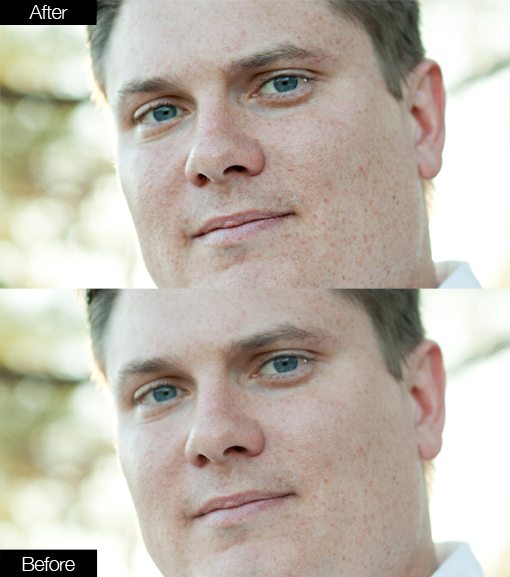
Step 3: Sharpen
Another big difference that sets professional photos apart is the sharpness of the image. If you take a close look at what you’re getting straight out of your camera compared to something from a magazine, odds are your images will look downright fuzzy by comparison.
There is a simple default sharpen command in Photoshop, but few professionals ever even touch it. You’ll find that you get much better results from more advanced techniques, the crowd favorite of which tends to be Unsharp Mask.
The Unsharp Mask command actually uses a blurred copy of the original image to reduce the dynamic range and effectively sharpen the points with higher contrast. It’s a fairly complicated scientific process dating all the way back to the 1930s, you can read more about it here.

All you really need to know is that you can use this command to achieve nice and sharp images. I have an action set up that runs the Unsharp Mask filter twice with the following settings:
First Time:
Amount: 150%. Radius: 1.5 pixels. Threshold 6.
Second Time:
Amount: 25%. Radius: 30 pixels. Threshold 0.
Throw these settings (these are set up for large images) into your own action and you’ll be stunned by how much crisper your images will look with just the click of a button.
Here’s an even closer look that really showcases the effect and how much it improved the sharpness of the image.
Step 4: Draw the Focus to the Face
This step is an interesting step that you might never think to do on your own, but believe me, it makes a huge difference. The idea here is that faces are generally the most interesting part of an image. The viewer’s eyes are naturally drawn to faces but you can help boost this natural tendency by playing with the highlights and shadows of the image.
The steps we’ll be taking essentially to better highlight the face work perfectly as a sort of artificial flash; it will illuminate your subject and darken the background.
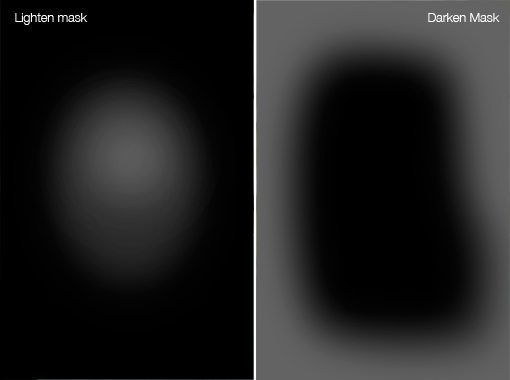
To begin, create two separate Curves Adjustment Layers: one that darkens the image and one that brightens it. Make the basic shape of your curves something close to what you see below.
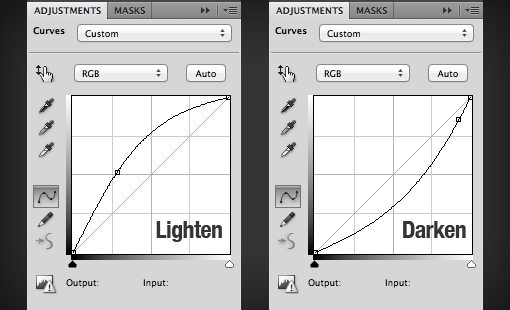
Next, apply a mask to each of the layers and fill the masks with black to hide them completely. Then grab a large soft brush and use it to paint in white on the masks. Use a brush at around 10% to lighten the face and then up the opacity to around 20-30% to darken the background. Here are the two masks that resulted from my efforts:
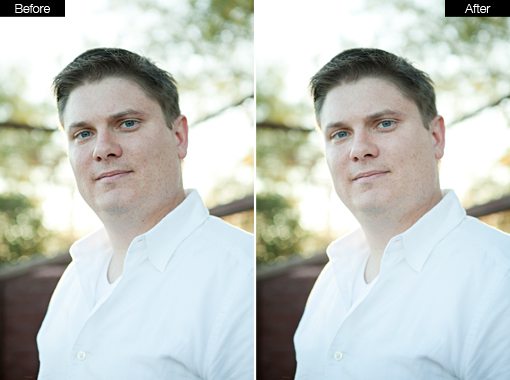
And here are the resulting before and after images. The difference seems super subtle when you compare them side by side but it’s actually a fairly significant change. Click here to see an animated GIF that swaps between the before and after image. Notice how the effect draws your eyes in towards the center of the image.
Step 5: Finishing Touches
To finish off your image nicely, I recommend two more adjustments. First, make one last, very subtle, global Curves adjustment to make sure you like the dynamic range of the image.
Finally, use a Hue/Saturation Adjustment layer to increase the saturation. Now, this is the part where newbies inevitably ruin the photo. The goal here is a slight increase in saturation, just enough to give a nice color boost without making your photo look like something from a Disney cartoon.
I usually up the saturation slider to seven and then reduce the opacity of the layer to anywhere between twenty and fifty percent. Being conservative here will pay off and prevent other photographers from scoffing at your over saturated images.
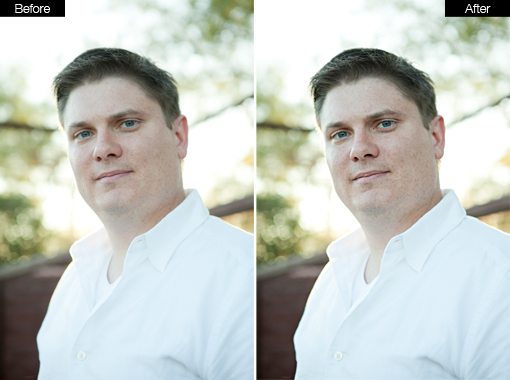
Here’s a look at the result of my final adjustments using these techniques:
Final Image
With that, we’re all finished. In five super easy steps we were able to take an average looking photo with minor white balance and exposure problems and turn it into a professional portrait!
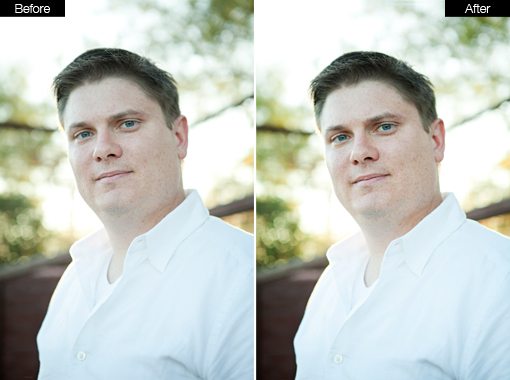
Here’s a look at the final image next to what we started with. This small image doesn’t do it justice so be sure to click the photo for a larger preview.

Conclusion
Given enough time, there are several other steps that I would take to complete this image. I might brighten up the the area around the eyes a bit, smooth out the skin; the possibilities are endless. However, when I’m under a tight time constraint, these are the five absolutely essential steps in my workflow.
Leave a comment below and let us know about any tips you have for creating stunning portraits. Is your workflow similar to the one above or do you take a drastically different approach. We want to hear all about it!