Create an Awesome Zooming Web Page With jQuery
Want to create a really unique and eye-catching effect for your site? How about an animation that zooms into a specific portion of the page when you click on it?
It may sound like a lot of work but with jQuery and Zoomooz.js, it’s a snap! I’ll walk you through the process step by step as we build a stunning zooming thumbnail gallery.
What We’re Building
Live Demo: Click Here
Zoomooz.js: Basic Introduction
When working with new libraries, it’s always best to start out with a dead simple example, just so you can get a feel for how everything works. With this project we’ll build a basic page to test out the zooming functionality of the script, then move onto a more practical example by creating a full on thumbnail gallery.
HTML: The Inclusions
This project has a ton of stuff to include in the head portion of your HTML. The first thing you want to do is head over to the Zoomooz.js homepage and download the library. You’ll see that it really contains not one but several JavaScript libraries. Luckily, in the download you’ll find instructions for running a script to combine and minimize everything so it’s not so big and messy (I’ll leave this step to you).
With that in mind, our little experiment will require the following code to begin:
<head>
	<title>Zooming Test</title>
	<link rel="stylesheet" href="style.css" type="text/css" media="screen" />
	<script src="http://ajax.googleapis.com/ajax/libs/jquery/1.4/jquery.min.js" type="text/javascript"></script>
	<script type="text/javascript" src="sylvester.js"></script>
	<script type="text/javascript" src="purecssmatrix.js"></script>
	<script type="text/javascript" src="jquery.animtrans.js"></script>
	<script type="text/javascript" src="jquery.zoomooz.js"></script>
</head>
The JavaScript
Next up, copy and paste the script below into your HTML. As you can see, what it does is target the class “zoom” and applies the “zoomTo” method from the library. Then, we apply the same thing to the body, which allows the user to click outside of any element to zoom back out to the normal level.
$(document).ready(function() {
	$(".zoom").click(function(evt) {
		evt.stopPropagation();
		$(this).zoomTo();
	});
	$(window).click(function(evt) {
		evt.stopPropagation();
		$("body").zoomTo();
	});
	$("body").zoomTo();
});
Don’t sweat it too much if you don’t understand this. Just keep in mind that we’ll need to apply the “zoom” class to elements that we want to be zoomable. This same exact snippet will be applied in both of today’s projects so feel free to just copy it over.
The HTML
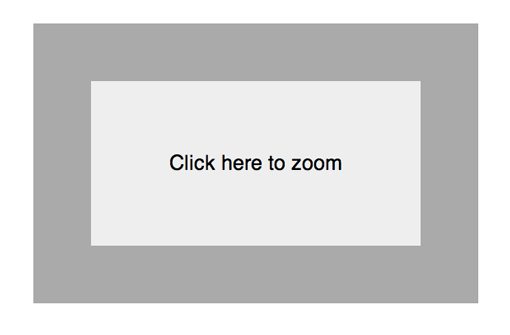
Next, we want to set up a basic testing ground. To do this, we need to create a container, an outer div and an inner div. The container may seem arbitrary but by including it and setting a width/height, it helps the zooming effect work properly on the outermost element.
<body>
	<div id="container">
		<div id="outer" class="zoom">
			<div id="inner" class="zoom">
				<p><a href="#">Click here to zoom</a></p>
			</div>
		</div>
	</div>
</body>
Also notice that we’ve applied the “zoom” class to both the outer and inner divs. The link at this point is really just a dummy element to help guide the user. The script works perfectly fine without it.
The CSS
Next, we apply sizes and positioning to each element. Again, a defined container size makes the zoom function properly, as does the “position: absolute” statement on the “inner” div. The script can be a little quirky so make sure you get these items right.
#container {
	width: 800px;
	height: 500px;
	margin: 0 auto;
}

#outer {
	width: 400px;
	height: 200px;
	background: #aaa;
	margin: 50px auto;
	padding: 70px;
}

#inner {
	width: 400px;
	height: 200px;
	background: #eee;
	margin: 0 auto;
	position: absolute;
}
Text CSS
Finally, here we just toss in some basic text styling for the paragraph along with a hover state. Again, feel free to ditch the link completely.
#inner p {
	text-align: center;
	font: 25px/200px Helvetica, sans-serif;
}

#inner p a {
	color: #000;
	text-decoration: none;
}

#inner p a:hover {
	text-decoration: underline;
}
Demo
With that, our simple demo is all finished. Launch the demo page to see it in action. Notice that clicking on each div gives you a different zoom level and clicking out in the body zooms you all the way out.
Zoomooz.js: Thumbnail Gallery
Using this same technique, we can build an awesome thumbnail gallery with a zoom in effect. It’s important to note though that this plugin probably works best for elements rendered with the browser. When we use it for images, as we will below, the unfortunate reality is that you have to load everything in at its zoomed-in size.
So, despite having a page full of small thumbnails, we actually load in a page full of large images, which can take several seconds depending on the user’s connection speed.
Despite this limitation, it’s still fun to push things to the limit and see what’s possible.
HTML
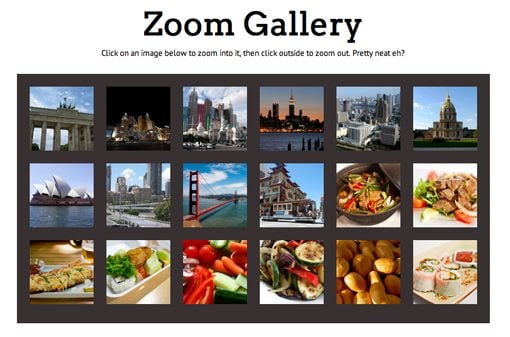
The HTML for this project is actually going to be super simple. I start out with a div containing some descriptive text, basically just a quick header and paragraph tag to explain what’s going on. Next, I created a large unordered list containing the images. That’s pretty much it!
Notice that I’ve applied the “zoom” class to both the “gallery” div as a whole and to each image within the div. This will give us two levels of zooming to play with. The library is intelligent enough to automatically handle relative zoom levels based on parent/child relationships.
Also, make sure you grab the head code and JavaScript from the previous example. I’m using the same exact setup, only my body HTML and CSS will be changing.
<body>

	<div id="headline">
		<h1>Zoom Gallery</h1>
		<p>Click on an image below to zoom into it, then click outside to zoom out. Pretty neat eh?</p>
	</div>

	<div id="gallery" class="zoom">
		<ul>
			<li class="zoom"><img src="http://lorempixum.com/600/600/city/1"/></li>
			<li class="zoom"><img src="http://lorempixum.com/600/600/city/2"/></li>
			<li class="zoom"><img src="http://lorempixum.com/600/600/city/3"/></li>
			<li class="zoom"><img src="http://lorempixum.com/600/600/city/4"/></li>
			<li class="zoom"><img src="http://lorempixum.com/600/600/city/5"/></li>
			<li class="zoom"><img src="http://lorempixum.com/600/600/city/6"/></li>
			<li class="zoom"><img src="http://lorempixum.com/600/600/city/7"/></li>
			<li class="zoom"><img src="http://lorempixum.com/600/600/city/8"/></li>
			<li class="zoom"><img src="http://lorempixum.com/600/600/city/9"/></li>
			<li class="zoom"><img src="http://lorempixum.com/600/600/city/10"/></li>
			<li class="zoom"><img src="http://lorempixum.com/600/600/food/1"/></li>
			<li class="zoom"><img src="http://lorempixum.com/600/600/food/2"/></li>
			<li class="zoom"><img src="http://lorempixum.com/600/600/food/3"/></li>
			<li class="zoom"><img src="http://lorempixum.com/600/600/food/4"/></li>
			<li class="zoom"><img src="http://lorempixum.com/600/600/food/5"/></li>
			<li class="zoom"><img src="http://lorempixum.com/600/600/food/6"/></li>
			<li class="zoom"><img src="http://lorempixum.com/600/600/food/7"/></li>
			<li class="zoom"><img src="http://lorempixum.com/600/600/food/8"/></li>
		</ul>

	</div>
</body>
Headline CSS
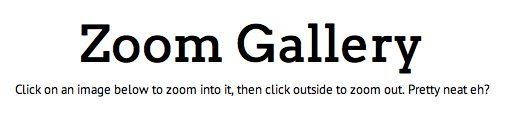
Next, we want to style the headline to look decent. Here I center-aligned the text, added sizes and line-height and set up some font-families.
* {
	margin: 0;
	padding: 0;
}

/*Text Styles*/

#headline {
	text-align: center;
	margin: 20px 0;
}

h1 {
	font-family: 'Arvo', Georgia, Times, serif;
	font-size: 50px;
	line-height: 65px;
}

p {
	font-family: 'PT Sans', Helvetica, Arial, sans-serif;
	font-size: 13px;
	line-height: 25px;
}
Notice that I’ve used “Arvo” and “PT Sans”, both of these are Google fonts and require some extra code back in the HTML, so if you want to use them too, just add this code into the head portion of your document:
<link href='http://fonts.googleapis.com/css?family=Arvo' rel='stylesheet' type='text/css'>
<link href='http://fonts.googleapis.com/css?family=PT+Sans' rel='stylesheet' type='text/css'>
With that, your headline should look something like this:
Gallery CSS
Now it’s time to finish off our project by styling the gallery. First, we want to style just the “gallery” div, which serves as the container for our thumbnails. I gave it a width of 720px, a height of 370px and a gray background color. I also included a little padding so that the thumbnails don’t bump up against the edges and a margin of “0 auto” to center the div horizontally (this only works if you specify a width).
/*Gallery Styles*/

#gallery {
	width: 720px;
	height: 370px;
	margin: 0 auto;
	padding: 10px;
	background: #383131;
}
After you’re done styling the gallery container, it’s time to make our big list of images conform to a grid. To do this, declare “none” as the list-style-type and float the “li’ elements left. Also notice the positioning context and the hover effect. For the latter of these, I dropped the margins upon hover so that the border wouldn’t affect the layout. So to start, each thumbnail has a margin of 10px, then on hover a thumbnail has a margin of 7px and a 3px border (7+3=10).
/*List Styles*/
ul {
	list-style-type: none;
	position: absolute;
	width: 720px;
}

#gallery ul li {
	float: left;
	margin: 10px;
	background: white;
	height: 100px;
	width: 100px;
}

#gallery ul li:hover {
	border: 3px solid white;
	margin: 7px;
}

#gallery ul li img{
	height: 100px;
	width: 100px;
}
With that, we’re all done! Click the image below to launch the demo.
Conclusion
Today we used HTML, CSS and JavaScript synergistically to create a crazy web gallery that zooms way into a thumbnail when you click. As we showed in the test demo, this same effect can work on any element you want!
We’ve barely scratched the surface of what Zoomooz.js can do. Stop by the project page to see how to do even more with this awesome plugin.