Create a Moveable Sticky Note With MooTools and CSS3
I recently came across a neat tutorial at Woorkup pointing out a MooTools feature that allows you to turn any item on a web page into a positionable element.
Today we’re going to use this technique to create a simple and fun sticky note that a user can play with and move anywhere on the page. Along the way will be using lots of CSS3 so make sure you’ve got a decent browser!
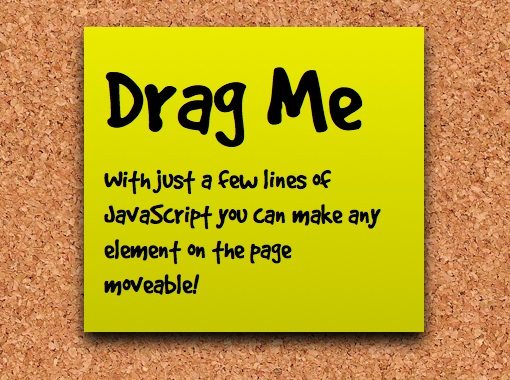
Sneak Peek
To check out what we’ll be building, click the picture below and view the live demo.
Step 1: The HTML
We’ll start off by building our sticky note just like we would on any site and finish by making it moveable. The HTML for this tutorial is super simple and contains only a couple divs and elements.
<div id="container">
	<div class="stickyNote">
		<h1>Drag Me</h1>
		<p>Lorem ipsum dolor sit amet, etc.</div>
	</div>
</div>
I kept the placeholder text simple here so you can easily see how simple the code is, but you can type in anything you like!
Step 2: Create The Background
To create the background, you’ll want a nice cork bulletin board texture. I ran a quick Google search and came up with this one.
You’ll need to crop out a small section and convert it to a seamless background. This can be easily accomplished in less than two minutes by following my tutorial on creating seamless backgrounds.
Step 3: Background CSS
Once you’ve got your seamless cork background image created, start your CSS with a basic reset and drop in the JPG.
* {
	margin: 0px;
	padding: 0px;
}

body {
	background-image: url(Bkg-pic.jpg); background-repeat: repeat;
	color: black;
}

#container {
	width: 960px;
	margin: 100px auto;
}
I’ve also styled the container here just a little by setting a width of 960 pixels and a top-margin of 100 pixels. The auto snippet automatically centers the div.
Step 4: Basic Sticky Styles
Next we’ll give our sticky some really basic styling.
.stickyNote {
	margin: auto;
	width: 300px;
	background: yellow;
}
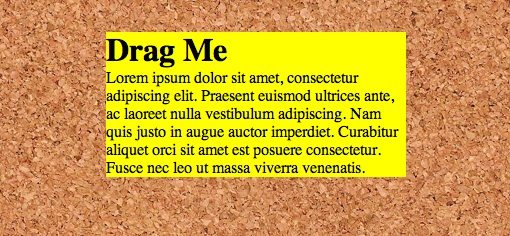
Here we’ve basically just set a yellow background and a width. This background will serve as the default for browsers that don’t interpret the CSS3 we’ll be adding next.
At this point your sticky should be just starting to take shape and look something like the image below.
Step 5: Advanced Sticky Styles
To make our sticky note look a lot better we’ll add in a gradient, box-shadow and some padding.
.stickyNote {
	margin: auto;
	width: 300px;
	background: yellow; /* Fallback */
	background: -webkit-gradient(linear, 0% 0%, 0% 100%, from(#EBEB00), to(#C5C500));
	background: -moz-linear-gradient(100% 100% 90deg, #C5C500, #EBEB00);
	padding: 20px 20px 20px 20px;
		-webkit-box-shadow: 0px 10px 30px #000;
		-moz-box-shadow: 0px 10px 30px #000;
}
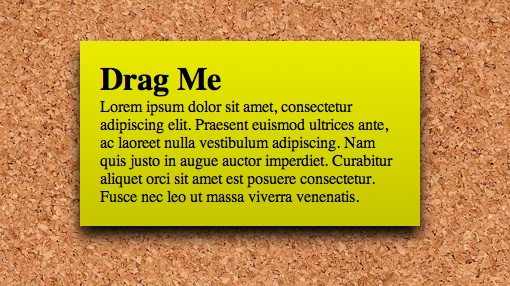
Notice that we’ve applied the gradients and shadows using both the Webkit and Mozilla syntax so it will work across as many browsers as possible. For the gradients, we’ve specified two colors and essentially told the gradient to spread vertically over the entire element. Note that the order of the color values must be reversed on the Mozilla version to produce the same gradient.
For the shadow, we’ve applied it after the padding with the following values: 0px horizontal offset, 10px vertical offset, 30px blur, and black for the color.
You should now have a decent looking sticky note with a shadow and a gradient!
Step 6: Using @Font-Face for a Handwritten Font
I want the “h1” text to look a little more handwritten but I don’t want to use an image so I’ll cruise over to FontSquirrel and download one of their excellent @font-face kits. With these kits all the work is done for you. All you have to do is download the fonts, copy them over to your root directory and grab the provided CSS snippet.
I chose the GoodDog kit. GoodDog is a nice thick handwritten font.
As I stated above, copy over the font files along with the following CSS provide by FontSquirrel with your download:
@font-face {
	font-family: 'GoodDogRegular';
	src: url('GoodDog-webfont.eot');
	src: local('‚ò∫'), url('GoodDog-webfont.woff') format('woff'), url('GoodDog-webfont.ttf')
	format('truetype'), url('GoodDog-webfont.svg#webfont') format('svg');
	font-weight: normal;
	font-style: normal;
}
To learn more about the syntax here, check out Paul Irish’s bulletproof @font-face syntax. All we need to know for now is that the first line tells how to refer to the font elsewhere in our CSS. So anywhere we want to use this font, we’ll type in ‘GoodDogRegular’.
Step 7: Header & Paragraph Styles
To finish off our sticky note, add the following CSS:
.stickyNote h1{
	font-size: 100px;
	font-family: GoodDogRegular, Helvetica, sans-serif;
}

.stickyNote p {
	font-family: GoodDogRegular, Helvetica, sans-serif;
	font-size: 30px;
	line-height: 35px;
	margin: 10px 0 10px 0;
	width: 280px;
}
As you can see, we’ve applied the GoodDog font to the h1 and the p tags and finished off with some basic positioning styles. Now after updating the placeholder copy to something more useful, here’s the finished sticky note:
Step 8: Make it “Moove”
Now our only step is to add the JavaScript that makes the item moveable. First import a copy of MooTools 1.11 into the header section of your HTML. The reason we’re using 1.11 is because the section we’re using hasn’t made it into MooTools 2.
After you’ve got that imported, add the following JavaScript to your HTML to make our sticky note moveable:
<script type="text/javascript">
window.addEvent('domready', function(){
	$$('#container div').each(function(drag){
	new Drag.Move(drag);});
});
</script>
The second line here is the important one. It tells MooTools to make any div inside the container moveable. You can customize this section to do anything you want. For instance, if you wanted any “p” tag inside a div with an id of “greatBigBox” to be moveable, just change the code to:
<script type="text/javascript">
window.addEvent('domready', function(){
	$$('#greatBigBox p').each(function(drag){
	new Drag.Move(drag);});
});
</script>
There you have it! That’s literally all you need to know to start making elements on your site moveable.
Conclusion
As you can see, creating the sticky note was really the hardest part of the process. MooTools took care of the heavy lifting to make the element moveable and reduced our JavaScript work down to just a few lines!