Using Less.js to Simplify Your CSS3
LESS is an amazing little tool that extends CSS with the addition of variables, mixins, operations and nested rules. What this means is that you can write leaner code very quickly. And with the recent rise of complex CSS3 properties, we have a few glaring examples of code that could definitely stand to be simplified a bit.
Today we’ll take a look at how to use the newest JavaScript implementation of LESS to simplify lengthy CSS3 markup. One of the key features we’ll be looking at that I haven’t seen discussed elsewhere is how to deal with multiple variables in mixins. It’s fairly simple but can be confusing if you’ve never tried it.
Anyone Can Use LESS.js
When I first looked at LESS, it seemed like an awful lot of work. There were all these weird compiling steps and Ruby scripts that ultimately felt like they were going to add time to my workflow instead of reduce it.
Fortunately, someone realized the whole process could be a lot simpler with JavaScript. So now implementing LESS is as easy as pasting two lines of code into your HTML and everything compiles automatically right in the browser! Let’s see how this works.
Getting Started
To make sure your LESS code compiles correctly, throw the following code into the head of your HTML.
<link rel="stylesheet/less" href="style.less" type="text/css" />
<script src="http://lesscss.googlecode.com/files/less-1.0.21.min.js"></script>
Notice that the typical rel=”stylesheet” has become rel=”stylesheet/less” and that we’ve linked to a Google-hosted version of LESS.js.
The next step is to create a style.less file. This can be named anything you want, just be sure it has the .less extension instead of .css like you’re used to.
Declaring Variables
By far one of my favorite features of LESS is that you can use variables just like you would in most major programming languages. This makes it extremely easy to set global styles that can be changed in a single location rather than sorting through your code to find every instance of that style.
To see how this applies on a practical level, let’s set a couple of color variables. Imagine that our web page will have a primary and a secondary color that is used repeatedly throughout the design. Rather than remembering the color code every time, we can simply set these to variables.
To set a variable in LESS, use the @ symbol:
@primaryColor: #383939;
@secondaryColor: #66bbe3;
That’s it! Now any time we want to use these colors in our design, we simply use the same CSS we always do but insert the variable name instead of the color code.
background-color: @primaryColor;
color: @secondaryColor;
Now anytime we change the color in the variable declaration, the change will be automatically applied throughout the rest of the code anywhere the variable is called. This can definitely save you a lot of time when you start tweaking your designs.
Operations
Just as with JavaScript and any other programming language you’re used to, LESS allows you to perform operations on variables. This can save you a lot of mental math in the long run.
As an oversimplified example, say you wanted to create a box that was twice as wide as it was tall. You could declare the height in a variable and then set another variable that is twice that number.
@boxHeight: 200px;
@boxWidth: @boxHeight * 2;
Then later in your code you would use these variables to set the height and width of your box. If you were to then go back and change boxHeight to 400px, boxWidth would automatically be set to 800px;
height: @boxHeight;
width: @boxWidth;
Mixins
Here’s where the CSS3 will come into play. To start off, let’s look at the basic syntax for a random CSS3 property, say border-radius.
-moz-border-radius: 12px;
-webkit-border-radius: 12px;
border-radius: 12px;
As you can see, the current way to ensure that this works across the largest number of browsers is to include all of the various browser-specific versions. Above we used border-radius in conjunction with -webkit-border-radius and -moz-border-radius.
Any time we want to implement rounded corners in our CSS, we have to manually list all these versions. I see your brain ticking away and forming an argument about how you could simply set these styles to a class, but what if you wanted the flexibility to tweak the border radius on a per element basis? Setting up a reusable CSS class is a good solution, but you can take this idea a lot further with LESS.
LESS allows you to essentially set multiple variables into a single class that can then be embedded elsewhere in your code. To setup up a mixin using LESS, use the following syntax:
.roundedCorners (@radius: 12px) {
	-moz-border-radius: @radius;
	-webkit-border-radius: @radius;
	border-radius: @radius;
}
The code above sets a variable for the radius and makes it equal to 12px, throws it into all of the border-radius versions, then stores all of this information in a class called .roundedCorners.
Now when we want to apply rounded corners to an object, we simply toss in the class.
#box {
	background-color: @primaryColor;
	.roundedCorners;
}
This will apply a 12px corner-radius to our box div using all of the appropriate proprietary versions.
Remember that the 12px radius we setup in the mixin is merely a default that gets passed when no parameters are specified during the call. You can alternately insert that class and quickly set the border-radius to a different number.
#box {
	background-color: @primaryColor;
	.roundedCorners(20px);
}
This code still uses all of the different border-radius versions but will automatically stick 20px in as the value for the radius. This makes it super fast to implement custom iterations of a CSS3 property. Let’s go deeper down the rabbit hole and see how to do this with more complicated properties.
Multiple Variable Mixins
Border radius was a simple example because it only contains a single value to work with, but what about more complicated properties like box-shadow?
-moz-box-shadow: 3px 2px 5px #D4D4D4;
-webkit-box-shadow: 3px 2px 5px #D4D4D4;
box-shadow: 3px 2px 5px #D4D4D4;
As you can see above, here we need to set four different variables to be uniform across the three versions. It may sound complicated but fortunately this works basically the same as it would in JavaScript. To keep the example simple, we’ll just use the default box-shadow to see how this is done.
.boxShadow (@hor: 3px, @vert: 2px, @blur: 5px, @shadow: #757171) {
	box-shadow: @hor @vert @blur @shadow;
}
Here we set variables for the horizontal and vertical offsets as well as for the blur radius and shadow color. Notice that these values are all enclosed in a single set of parentheses and separated by commas. Then on the inside of the brackets we write it out with the variables just like we did the numbers above, with no commas separating the values.
So let’s say we wanted to apply rounded corners, a box shadow and a transition to an item using LESS and CSS. The code you use would look something like the following:
/*Rounded Corners*/
.roundedCorners (@radius: 12px) {
	-moz-border-radius: @radius;
	-webkit-border-radius: @radius;
	border-radius: @radius;
}

/*Box Shadow*/
.boxShadow (@hor: 3px, @vert: 2px, @blur: 5px, @shadow: #757171) {
	-webkit-box-shadow: @hor @vert @blur @shadow;
	-moz-box-shadow: @hor @vert @blur @shadow;
	box-shadow: @hor @vert @blur @shadow;
}

/*Transition*/
.transition (@range: all, @time: 1s, @ease: ease-in-out) {
	-moz-transition: @range @time @ease;
	-webkit-transition: @range @time @ease;
	-o-transition: @range @time @ease;
	transition: @range @time @ease;
}
Then the implementation of these would be similar to the code below.
#box a {
	display: block;
	height: @boxHeight;
	width: @boxWidth;
	background: @primaryColor;
	.roundedCorners(20px);
	.boxShadow;
}

#box a:hover {
	background: @secondaryColor;
	.transition;
}
As you can see, we applied the variables for the height, width and color of the box, then implemented the roundedCorners and boxShadow classes. Finally, we created a hover event that transitioned the background color from the primary color to the secondary color.
Nested Rules
The example above can be simplified even further by utilizing LESS’s nested rules feature. Watch how we can throw all the box styles into the same set of brackets and eliminate the need to type out the div ID every time.
#box {

	a {
		background-color: @primaryColor;
		color: #fff;
		display: block;

		height: @boxHeight;
		width: @boxWidth;
		line-height: @boxHeight;

		margin: auto;
		margin-top: 50px;

		text-align: center;
		text-decoration: none;

		.roundedCorners(20px);
		.boxShadow;
	}

	a:hover {
		background: @secondaryColor;
		.transition;
	}

	p {
		font-size: 50px;
		font-family: helvetica, arial, sans-serif;
	}
}
As you can see, all of the box item’s link styles, link hover styles and paragraph styles are contained within the same parent.
Compiling
I know what you’re thinking, all of this is well and fine, but can I really use it? Does it load slower than standard CSS? What browsers support it?
It turns out all of these and other similar questions don’t really matter. The idea behind LESS is to speed up and simplify only the development step. This means what goes live on your final website should be plain old CSS, not LESS.
After you’re finished working on your site, you need only compile the LESS into CSS using your browser. To do this, simply open up your HTML file in a browser and view the source CSS. What you’ll see, regardless of what you actually coded, is a normal CSS structure. Simply copy and paste this into as CSS document and you’re ready to go.
Compiling with LESS.app
To make things even easier, you can completely automate the compiling process using the free LESS application.
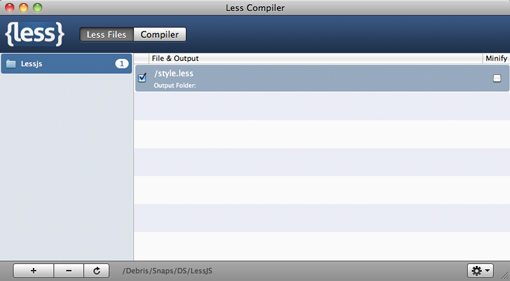
All you have to do is drag in the project folder containing your LESS files… that’s it! There’s no step two. As you continue to tweak and save your LESS files, a new CSS file will automatically be generated.
Conclusion
To sum up, LESS can now be implemented with only two lines of code in your HTML and can dramatically change the way you write CSS. Spend a few months with LESS and you’ll be creating and tweaking complex stylesheets faster than ever before.
You can use LESS to create variables, perform operations on variables, nest rules, and build complicated mixins to simplify your CSS3.
Leave a comment below and let us know what you think of LESS. Do you think it’s a great tool or a waste of time? We want to know!