Extends and Control Directives: Two Crazy Things Sass Can Do That LESS Can’t
LESS and Sass are aimed at accomplishing the same thing, and are indeed so similar that you could easily confuse the two, but are they really created equal? Is there anything that one can do that the other can’t?
On a feature to feature basis, each syntax has one or two things that the other doesn’t. However, despite the fact that I was initially drawn to LESS’ simplicity, in the long run I couldn’t help but be sucked in by a few key features that make Sass really powerful. Follow along as I blow your mind with some of the amazing and unique features of Sass.
LESS vs. Sass
Both Sass and LESS have been around for quite a while now but it seems they really hit their stride in 2011 and gained a lot of popularity. Both provide excellent ways to extend CSS to be more programmer friendly, which leads to more logical and concise code that utilizes far less repetition.
Who’s More Friendly?
Recently here on Design Shack I’ve been giving lots of attention to LESS. Admittedly, I find it to be the more approachable of the two options. Some will argue against this notion until they’re blue in the face, but the simple fact remains that LESS has a really nice setup: use a simple .js file for testing and compile the code automatically with a user-friendly app: Less.app.
No matter how much you think that every CSS developer should know Ruby and be a Terminal whiz, the reality is that many don’t fit this description at all and would rather spend the day learning one thing (LESS) instead of two (Sass + how Ruby gems work).
Granted, Sass only requires a teeny tiny bit of Terminal use that pretty much anyone can handle, but you’d be surprised at just how many people are turned away due to this.
Not So Fast
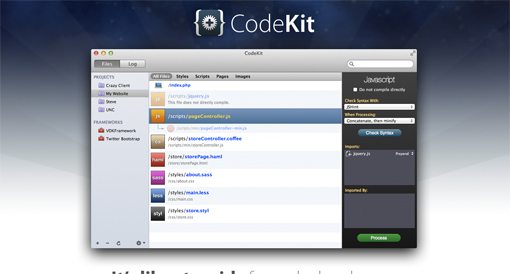
Recently though, this landscape has changed pretty dramatically. Solutions such as CodeKit are popping up that make writing Sass and outputting CSS every bit as effortless as using Sass.
In fact, CodeKit automatically compiles LESS, Sass, Stylus and CoffeeScript files. All you have to do is drop in your project folder and your work is done. So much for LESS being more friendly!
Who’s More Powerful?
For many developers, the argument over which is easier to implement is fairly petty considering that both LESS and Sass are pretty simple to begin using. The real argument then comes down to power: which language can do more?
The answer isn’t terribly simple. It turns out that both LESS and Sass have unique features not shared by the other. However, it must be said that in this area, Sass really pulls out some impressive punches. Let’s take a look at two of my favorite: @extend and control structures.
Sass @extend

Every time I say anything about LESS, the folks in the Sass camp start raving about Sass’ @extend command. It turns out, there’s a good reason for this: it’s actually pretty dang useful.
The magic behind @extend is that it allows you to style selectors that piggyback on other selectors and borrow their properties. Let’s say you were styling a blog and wanted two different style sets: one set for a comment and another for any replies to that comment. Your style for each looks almost identical, with a few exceptions:
.comment {
	background-color: #eee;
	border: 1px solid #ccc;
	color: #4e4e4e;
	float: right;
	font: 20px/30px Georgia, serif;
	margin: 20px 0 20px 20px;
	padding: 20px;
	width: 250px;
}

.reply {
	background-color: #ddd;
	border: 1px solid #bbb;
	color: 4#e4e4e;
	float: right;
	font: italic 20px/30px Georgia, serif;
	margin: 20px 0 20px 20px;
	padding: 20px;
	width: 250px;
}
Alternatively, you could only use the “.reply” class for the different styles, but this would require you to apply both the “.comment” and “.reply” classes to your reply HTML divs. So how can we keep our markup slim but make this code less repetitive?
With Sass’ @extend, this process is super easy. Once we have our initial selector in place, we simply type “@extend” plus the name of the selector that we want to steal from and all of the code related to the first selector will be applied to the second. From here we can then go in and apply our exceptions, additions, etc.
.comment {
	background-color: #eee;
	border: 1px solid #bbb;
	color: #4e4e4e;
	float: right;
	font: 20px/30px Georgia, serif;
	margin: 20px 0 20px 20px;
	padding: 20px;
	width: 250px;
}

.reply {
	@extend .comment;
	background-color: #eee;
	font-style: italic;
}
Note that we’re using the newer .scss syntax.
CSS Output
The output from this @extend command is nice and clean and really represents how we should’ve coded our CSS in the first place. Sass automatically finds both the shared and unique properties and sets each to the appropriate selectors.
.comment, .reply {
  background-color: #eee;
  border: 1px solid #bbb;
  color: #4e4e4e;
  float: right;
  font: 20px/30px Georgia, serif;
  margin: 20px 0 20px 20px;
  padding: 20px;
  width: 250px;
}

.reply {
  background-color: #eee;
  font-style: italic;
}
So why not just do this in the first place? Great question! You could in fact do just that. However, the Sass syntax represents a slightly more linear thought process that is easier for some to wrap their mind around.
Keep in mind that this is an overly simplified example, if you were working with a huge project with tons of selectors, the benefits of Sass would be even clearer.
Going Further
Furthering its usefulness, the @extend behavior can handle quite a bit of complexity. For instance, you can use multiple extends on a single selector:
.reply {
	@extend .comment;
	@extend .somethingElse;
	background-color: #eee;
	font-style: italic;
}
You can also chain @extends. This allows you to gradually build layers of complexity in an easy to understand way.
.comment {
	background-color: #eee;
	border: 1px solid #bbb;
	color: #4e4e4e;
	float: right;
	font: 20px/30px Georgia, serif;
	margin: 20px 0 20px 20px;
	padding: 20px;
	width: 250px;
}

.reply {
	@extend .comment;
	background-color: #eee;
	font-style: italic;
}

.levelThreeComment {
	@extend .comment;
	@extend .reply;
	font-size: 18px;
}
As you can see, this is actually a little easier to interpret than the compiled CSS form, which is beautifully concise but can be somewhat confusing.
.comment, .reply, .levelThreeComment {
  background-color: #eee;
  border: 1px solid #bbb;
  color: #4e4e4e;
  float: right;
  font: 20px/30px Georgia, serif;
  margin: 20px 0 20px 20px;
  padding: 20px;
  width: 250px;
}

.reply, .levelThreeComment {
  background-color: #eee;
  font-style: italic;
}

.levelThreeComment {
  font-size: 18px;
}
To read more about Sass @extends, check out the official documentation from the Sass website.
Control Directives
The Sass @extend command is definitely a killer argument for going with Sass over LESS. It’s super helpful and helps keep your complex CSS sparkling clean, organized and easy to read.
However, on the crazy scale, @extends score pretty low. If you really want to see where the Sass folks went off into some sketchy territory, you should check out the control directives, which insert some serious programming constructs into CSS.
All you hardcore fans of pure CSS who aren’t sure about Sass in the first place will definitely not like what you’re about to see. However, those of us who are open to having fun with CSS and already love to program, this gets really interesting.
Not for Day to Day Styling
If you take one look at the examples below and decide they seem too complicated for you to use in your projects, you’re probably right. They come with this warning right from the Sass developers:
“Note that control directives are an advanced feature, and are not recommended in the course of day-to-day styling. They exist mainly for use in mixins, particularly those that are part of libraries like Compass, and so require substantial flexibility.”
If Statements
If you never thought you’d see the day when if statements and CSS met, you were wrong. Sass supports basic if/else functionality and compiles it to CSS. For instance, in the example below, we want the text color to be black in all cases except those where the base color is already black, then we set it to white.
.p {
	@if $base-color == black {
	    color: white;
	  } @else {
	    color: black;
	  }
}
So, let’s say we use this snippet in some template that we have set up elsewhere and import that template into our new project file. If at any point we set the base-color to black like this…
$base-color: black;
our compiled CSS will set the paragraph color to white.
p {color: white;}
If on the other hand, the base-color variable is set to anything else…
$base-color: blue;
the paragraph color will automatically default to black.
p {color: black;}
@for Loop
In addition to if statements, Sass supports for loops. For instance, let’s say we wanted to create four column classes that gradually increase in width. Instead of typing out each class manually, we can save ourselves a lot of work by just setting up a simple for loop.
@for $i from 1 through 4 {
  .column-#{$i} { width: 10px * $i; }
}
This statement will compile to the following CSS:
.column-1 {
  width: 10px; }

.column-2 {
  width: 20px; }

.column-3 {
  width: 30px; }

.column-4 {
  width: 40px; }
Notice how it used the “$i” counter to increase the number appended to the class name each time and then increased the width by multiplying the current “$i” value by ten pixels.
@while Loop
Many programming languages support different styles of loops, so Sass follows suit by including not only a “for” structure but a “while” structure as well. This time, let’s say we want to build the 1 Kb Grid classes using Sass. Here’s how you would do it:
$i: 1;
$width: 60px;
@while $i < 13 {
.grid-#{$i} { width: $width; }
$width: $width + 80px;
$i: $i + 1;
}
[/code]
</div>
</ br>
This statement repeats twelve times, creating .grid classes with names that increase by one each time and set those classes to a width that increases by 80px each time. This tiny little snippet of CSS compiles to this large chunk of code:
<div >
[code lang="css"]
.grid-1 {
width: 60px; }
.grid-2 {
width: 140px; }
.grid-3 {
width: 220px; }
.grid-4 {
width: 300px; }
.grid-5 {
width: 380px; }
.grid-6 {
width: 460px; }
.grid-7 {
width: 540px; }
.grid-8 {
width: 620px; }
.grid-9 {
width: 700px; }
.grid-10 {
width: 780px; }
.grid-11 {
width: 860px; }
.grid-12 {
width: 940px; }
@each
The final control structure is @each, which allows you to concisely list out a set of variables to distribute across a larger chunk of code. For instance, let’s say you wanted to create a few classes that utilize different font-families, you might do something like the following:
@each $font in Helvetica, Monaco, Verdana {
  .body#{$font}Family {
    font: 12px/1.5 #{$font}, Arial, Lucida Grande, sans-serif;
  }
}
This will compile to the CSS below. The result is three separate classes that utilize the three font names that we placed into the first line above.
.bodyHelveticaFamily {
  font: 12px/1.5 Helvetica, Arial, Lucida Grande, sans-serif; }

.bodyMonacoFamily {
  font: 12px/1.5 Monaco, Arial, Lucida Grande, sans-serif; }

.bodyVerdanaFamily {
  font: 12px/1.5 Verdana, Arial, Lucida Grande, sans-serif; }
Once again, to read more about control directives, you should definitely check out the official documentation. There’s a particularly nice @each example there that uses image names instead of fonts. It’s more useful and practical than my example above but I wanted to illustrate a different possibility.
Before You Complain…
The obvious argument against using these is that they’re directly in violation of my arguments for easy to read code. These save you typing time, but require some pretty heavy interpretation, enough to make your head spin at times. Keep in mind though that the Sass folks recommend these mostly for use in mixins, which in then end can still help make your code simpler due to their reusable nature.
I freely admit that it’s probably best to avoid control structures where possible, but I can’t help but get excited about the fact that Sass includes these, warning or no warning. They really speak to the power of the syntax and how committed the Sass team is to making it an extremely advanced and unique web development tool.
Conclusion
This is by no means an exhaustive discussion of the benefits of Sass over LESS, it’s mearly a look at the two areas that I found to be the most impressive and interesting. Both @extend and control structures provide developers with some powerful tools that you simply don’t find elsewhere. Similarly, LESS has a few tricks up its sleeve, such as Namespaces, that you won’t find in Sass.
Ultimately, whether you use Sass or LESS shouldn’t matter too much. It boils down to a matter of opinion and if you like one better than the other, you shouldn’t really have to feel like that’s something to argue about. If I take the Sass route and you take the LESS route, both of our websites should still contain a pure CSS file in the end (you should always compile before uploading). Why should I care that the route you took to get there was different than mine? As long as your resulting code is valid and well-structured, it’s just as good as mine.
That being said, I’m anxious to hear which syntax you prefer. As for me, I’m quite comfortable using either. To be honest though, I started firmly in the LESS camp but have recently been really drawn to some of the power that Sass displays in features like those above.
What do you think? With tools like CodeKit making both syntaxes so easily approachable, what are your reasons for using one over the other?