How to Use TypeKit on Your Site: Step-by-Step
Several options have cropped up recently for adding custom fonts to your website by utilizing the @font-face selector. TypeKit is an exciting new player in this game because it stands out in two key areas: ease of use and richness of fonts available. This tutorial will take you through several small, super simple steps to get TypeKit up and running on your site. You won’t find any advanced techniques or scripting here, so even if you’re a novice web designer this should be a cinch!
First: The Bad News
If you cruise over to the TypeKit website you’ll see that you are only given the choice to sign up for an invite. This doesn’t mean you’ll get one right away so you may have to wait awhile before getting the chance to sign up. Fortunately, I was able to snag an invite from Design Shack site owner David Appleyard so I could show you around!
Signing Up
When you sign up, you are faced with choosing between one of four plans. While you shake your head in disappointment, let me explain why it isn’t just a free service. Simply put, fonts cost money. There are a few mega font foundries that create and sell quality fonts that they don’t wont people downloading for free. It used to be that even if you, being the good citizen that you are, paid full price for a quality font, you still couldn’t put that font on your site due to licensing issues. In short, embedding the font meant that users could steal it for themselves. TypeKit skirts around this issue by virtue of the deals it has made with the major foundries to license fonts for web use only. What this means is that you aren’t stuck with ugly, low quality free fonts for your site but rather a large selection of top-notch professional fonts like you’d see in the print world. Long story short, quality comes at a price. Here are the plans you can choose from:
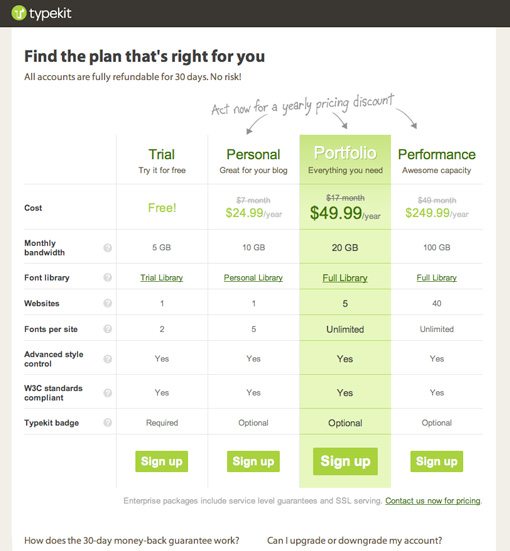
Note that for this tutorial I’ll be using the free demo so we’ll see a trimmed selection of fonts and will be limited to two custom fonts on our site. With that in mind let’s take a look at our testing ground!
The Test Site
For this tutorial I’ve built a quick and dirty single page site with tons of text. You’ll need to know that I’ve styled the main header using the “h1” tag and the paragraph text using a simple “p” tag. To view the test site live (and much larger), click here or just check out the screenshot below.
Kit Setup
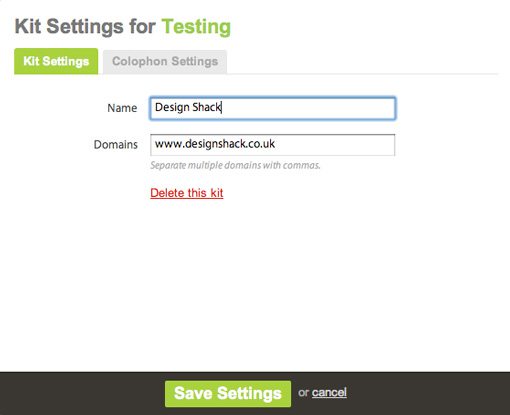
After choosing a plan your next step is to create your first kit and setup a URL. Keep in mind you don’t need to insert a specific page address but rather the url for the site as a whole. For instance, you can see that I’ve just typed in the main Design Shack URL.
Upon signing up, you should also be given a script to embed into your site. Next we’ll take a look at what to do with this.
Embed Code
The key to having TypeKit override your CSS is the following snippet of code they give you to insert into your html:
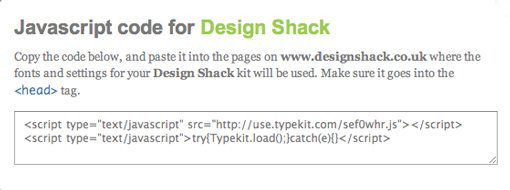
Simply place this code into the header section of the HTML page you want to change. That’s all the coding you have to do! Just one simple copy and paste and you’re ready to go. Make sure you publish the updated HTML page to your site before you start adding fonts.
Adding Fonts
Believe it or not, we’re almost finished. All that’s left is to pick some fonts and tell them where to go. As I mentioned before, TypeKit gives you a large selection of high quality fonts to choose from if you select one of the paid plans. Remember that the free plan has a much more limited (though by no means poor) selection. To replace our main header, we’ll select an edgy distressed font. Down the right side of the font list you’ll see a series of tags. Click on the “distressed” tag to see only the distressed fonts.
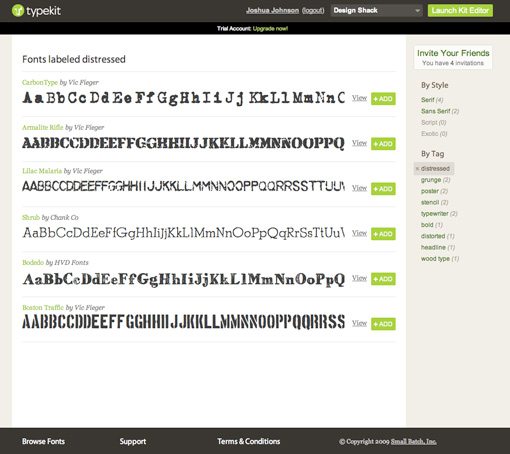
Feel free to browse and choose any that you like. When you find one you like, click the “add” button (I chose Bodedo). After clicking the “add” button, the kit editor window should pop up.
The Kit Editor
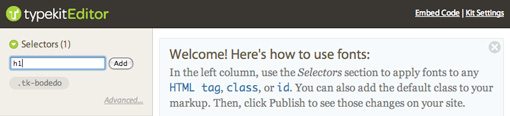
After adding a font, you should be presented with the following window:

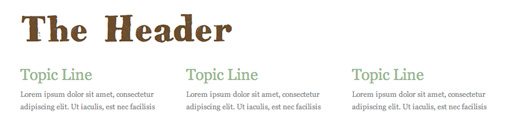
This is where you will be applying the font you chose to your site. Notice in the upper left of the editor you’re given a custom selector to use in your code (in our case, .tk-bodedo). You can go into the code on your site and replace any selector you wish with the one given here to replace the font. However, what we’re going to do instead is tell TypeKit the existing tags we’ve used on our site. As I said before, our main header is simply an “h1” tag so all we need to do is type “h1” (without quotes) into the field under “selectors” and hit add.
Now hit the publish button. That’s it! TypeKit will do the rest. After a minute or two, refresh your page and you should see the font appear.
Adjusting Your CSS
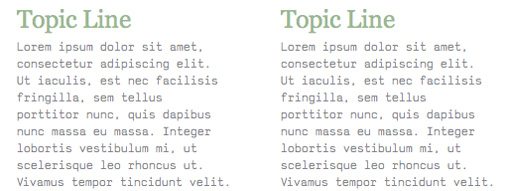
One of the great things about TypeKit is that it only replaces the font. All the settings related to the font are still controllable within your CSS. Check out my test page after I added a custom font to the paragraph copy.
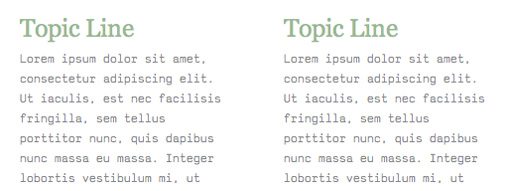
Notice that the new font looks really weird with my current line height settings. It’s way too spread out and is now eating up a lot more vertical space. To fix this problem, I just went into my CSS file and dialed down the line height of my paragraph copy. Any change I make in my CSS aside from the actual font itself will affect the new font on my site. So you can style to your heart’s content and your custom font will remain in place! Here’s my adjusted line height.
The Finished Product
Take a look at the finished site here to see TypeKit in action. Despite the fact that the site was arguably a lot more attractive before we began, you can easily see the benefits of TypeKit. Note that the custom fonts you see are not resident on your computer and yet they preview perfectly and are easily selectable. The best part is that all this was done with a user-friendly GUI and just one snippet of code that we didn’t have to write! However, I’m not all praise and compliments when it comes to TypeKit. Before we conclude, let’s briefly discuss what I found to be less than perfect.
The Critique
First let’s discuss technical bugs. I mentioned earlier that when you hit the “publish” button you have to wait a minute before the site updates. When you’re used to seeing coded changes update immediately, this can be immensely frustrating. The frustrating part is the inconsistency. Sometimes changes take effect almost instantly while others leave you hitting the refresh button for minutes on end waiting to see the change take place. I also experienced some problems with the site itself. The kit editor window refuses to launch for me about 50% of the time, instead I get a blank window with a never ending loading animation. Closing the window and reopening the kit editor fixes the problem, but it’s still quite an annoyance. Finally, the cost structure isn’t easy for every designer to justify. Sure, having selectable text on your site is great, but for $250 a year many people will probably just stick to inserting fancy headlines as images.
Conclusion
That’s about all you need to know to get started with TypeKit. We went over signing up and choosing a plan, setting up your first kit, adding fonts to your site, publishing your changes, and adjusting your CSS after implementing custom fonts. This is a lengthy article but that’s only because I split the process into such small, manageable steps. In all reality you can have TypeKit up and running on your site in minutes. Go sign up for your invitation and be sure to tell us what you think of TypeKit and other custom font solutions you’ve found. Feel free to ask any questions using the comments below or via Twitter.