What Is CSS? Back to Basics
This is the third article in our back to basics series where we’re taking a look at the absolute beginning concepts of web development. If you’re a designer with little to no knowledge of web programming, this series is for you.
In our first article, we went over what HTML is and in our second article we outlined the basic anatomy of an HTML document. Today we’ll jump to a new topic and answer a very important question: What is CSS?
What is CSS?
Before we answer this question directly, let’s think back to the answer for Part One’s question: What is HTML? As we learned, from a conceptual standpoint, HTML could be said to mostly comprise the content and structure of a web page. We used the metaphor of a skeleton and discussed how HTML forms the basic building blocks of the World Wide Web as we know it.
If there is a paragraph in a web page, it’s from the HTML. If there’s a headline and an image gallery, once again, these elements were likely inserted as snippets of HTML code (obvious exceptions for Flash and the like).
With this in mind, Cascading Styles Sheets, more commonly referred to as CSS, become the way to style that content. Color choices, repeating background textures, shadows, rounded corners and even layout are all the area of CSS. As a designer, this is the area you will likely thrive in and enjoy the most.
To get a crystal clear picture of just how important CSS is to web design, let’s take a look at a web page with and without a stylesheet.
Before & After CSS
Considering that CSS is relegated to simply “styling” a web page, you might be tempted to think that it is merely icing on the proverbial cake, meaning that it purely provides small aesthetic adjustments. However, the impact that CSS has on a web page is enormous.
To illustrate this idea, here’s a screenshot of the Design Shack homepage with the primary stylesheet disabled:
Before CSS
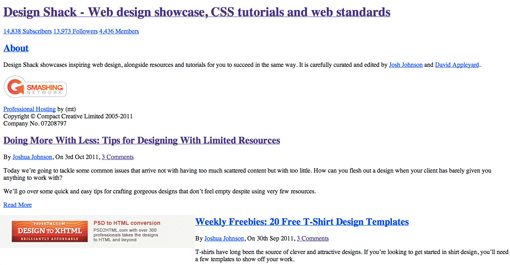
This basic structure could be styled in an infinite number of variations, each of which look so dramatically different that, despite having the same exact HTML, you wouldn’t even recognize them as the same page!
With the inclusion of a single stylesheet, Design Shack’s homepage turns into this:
After CSS
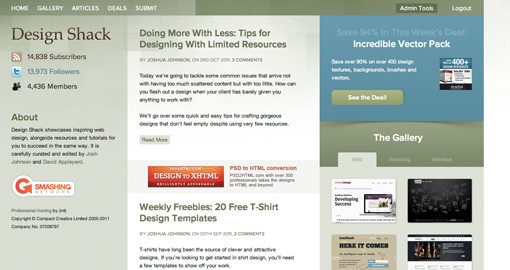
Can I get a “holy crap”? You’ll notice that these aren’t simple color changes. The influence that CSS has over the user experience is dramatic. The entire layout has been reconstructed into a three column format, background textures have been applied and the typography has been drastically improved.
How Does It Work?
So how does CSS perform all that magic? What insane feat of coding will you have to learn to tell the browser to make such a dramatic transformation? The good news is, CSS is a lot easier than you might think. It’s fairly low level stuff compared to the kind of hardcore coding you’ll have to do in languages like PHP. It’s also incredibly fun once you get the hang of it.
It’s All About Selectors
In part one of this series, we learned about how HTML is built primarily on tags. Just about every snippet of HTML is made up of HTML elements wrapped with a set of tags that roughly conform to this syntax:
<h1>Headline Here</h1>
<p>This is where you put a paragraph.</p>
With CSS, the syntax is completely different and yet closely related. We can really drill down and target every little piece of our HTML and style it on its own. We accomplish this task with CSS selectors.
A selector is exactly what it sounds like: it allows you to select something for manipulation, in our case a particular portion of the HTML. Many CSS selectors correspond directly to the tag they’re targeting. So, for example, if we wanted to style content between the h1 and paragraph tags above, we would use the following.
h1 {/*Some Code Here*/}
p {/*Some Code Here*/}
As you can see, the selector for the “h1” tag is simply “h1”. The selector is then followed by a set of curly brackets, which will contain the entire set of code relating to that selector.
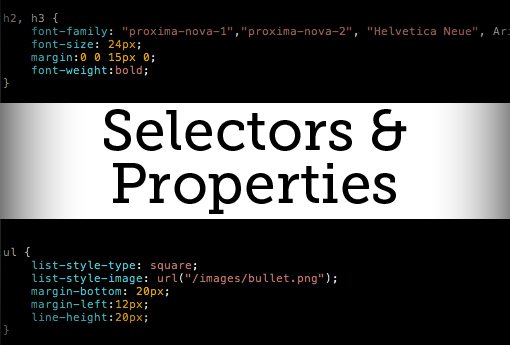
The code inside the curly brackets is broken up into properties, which define exactly what it is that you’re changing about the targeted portion of HTML. Just like in Photoshop, each piece of the design has several properties that can be changed. A given passage of text has a font, font-size, color, line-height, etc. Each of these should be manually set instead of merely relying on defaults, which are inconsistent among browsers.
Here’s a look at this syntax in action. We have a selector, followed by curly brackets, which contain a property and its value followed by a semicolon (optional on the last property in a list).
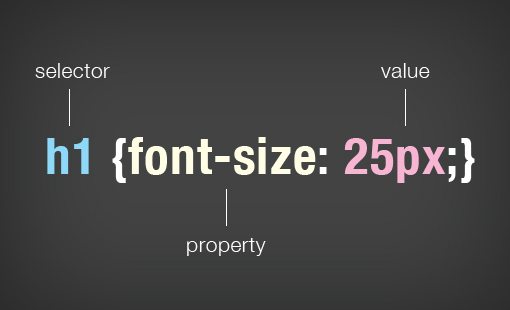
h1 {font-size: 25px;}
This code is highly human readable and will simply set the size of all the h1 text on the page to 25 pixels. The terminology here is very important so here’s another look for you visually-minded folks.
Using Multiple Properties
The example above is fairly simplified. As I mentioned, each selector typically has several properties that are set by the developer. Different coders organize their code in different ways but here’s how a block of CSS is typically structured.
h1 {
    font-size: 45px;
    font-family: Helvetica, Arial, sans-serif;
    color: #424343;
}
Here we set the font, its size and its color. The “font-family” uses backup fonts in the case that the lead font isn’t present on the end user’s machine.
More Than Tags
The selector examples above target simple HTML tags, but CSS comes with much more complicated selectors that can target all kinds of HTML. You can even combine or “chain” various selectors together.
For instance, let’s say you had two paragraphs inside of two different divs in your HTML:
<div id="mainSection">
    <p>Lorem ipsum doller.....</p>
</div>

<div class="secondarySection">
    <p>Lorem ipsum doller.....</p>
</div>
Now, if I simply targeted the paragraph tag in my CSS, both of these paragraphs would be affected. However, let’s say I want them to look different, how would I do that?
Here’s one way, see if you can figure out what’s going on:
#mainSection p {
    color: gray;
}

.secondarySection p {
    color: black;
}
As you can see, we set each paragraph to a different color by combining selectors. We targeted the “p” in both cases but in the first chunk I targeted the “mainSection” id and in the second I targeted the “secondarySection” class. The difference being that classes are reusable and can be applied to multiple items in the HTML while id’s are unique. So once we style our “secondarySection” class, we can apply these styles easily to other divs just by slapping on that class in the HTML.
In CSS, you always want to be as efficient as possible, so do everything you can with as little code as possible. Classes are a huge time and space saver.
Cascading?
Now we have a rudimentary understanding of “stylesheets” and how they “style” the HTML, so where does the “cascading” part come in?
This once again comes back to the notion of efficiency. Once you set a generic style, it “cascades down” to other elements. This code for example turns every single anchor tag on the page red:
a {color: red;}
Specificity matters a great deal though so if we add a little bit, everything changes:
a {color: red;}
#section a {blue;}
Now every link on the page is colored red, except those with the “section” id, which will be blue. The more specific selector overruled the general selector.
For a brief overview on how to figure out which rules will override others, check out Getting StartED with CSS.
How Does Web Design Work?
Now that we’ve gone through what HTML and CSS are, you should be able to see how they work together to create finished web pages. Let’s run through a quick example of a design process that someone might go through.
Photoshop Mockup
First, someone cracks open Photoshop and basically designs the site. What it will look like, what colors will be used, where the images will be placed, the various columns of content: everything.
Note that this step is completely optional. There’s quite a major trend these days towards designing in the browser and skipping Photoshop or Fireworks comps completely.
HTML
Next, the web developer, who might or might not be the same person, will look at the mockup and pick out portions that can go into the HTML such as paragraphs, images, etc. The basic visual groups in the design are mirrored in HTML with divs or other structural elements.
CSS
The content in pure HTML will be bare of all styling, so next the developer looks at the layout, fonts, colors, etc. that were used in the Photoshop mockup and translates these characteristics to CSS. As the developer codes, he/she watches the live preview to see how the code affects the content until everything is just right.
Conclusion
After reading the three articles in this series, you should have a solid idea of what HTML and CSS are and how they work together to create web pages.
This was in no way an exhaustive look into either of these syntaxes, nor was it meant to really get you up and running with your own code. Instead, it fills that conceptual gap of knowledge relating to just what the heck these languages are and how they’re used. Whether or not you ever want to be a web developer, possessing this knowledge will make you a better web designer.