Layout at Light Speed With the Wireframe Toolkit for Keynote
The Wireframe Toolkit for Keynote allows just about anyone with a basic grasp of how to use presentation software to rapidly build user interface mockups for iOS and the web. If you don’t have Keynote, don’t worry, there’s a Powerpoint version included as well!
Today we’re going to give you super quick run through of how to use the Wireframe Toolkit for Keynote to build a basic web app layout. If you can copy and paste, you can do this!
What You Get
Your Wireframe Toolkit download gets you a sizable list of Keynote and Powerpoint templates. As you can see in the screenshot below, you are given four different versions of the templates: Keynote ’08, Keynote ’09, Keynote for iPad and Powerpoint.
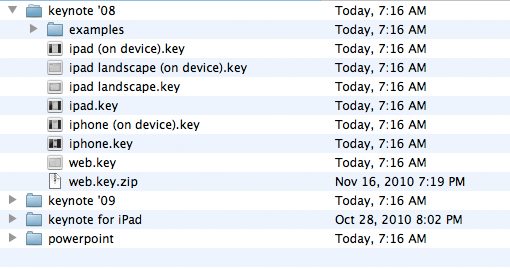
Each folder comes with several different toolkits aimed at providing you with the interface elements you’ll need for designing for the iPhone, iPad and of course the plain old web. There are also a few finished examples that you can pop open to get a feel for how it all works.
Slides vs. Master Slides
To start up, find the toolkit that you want to work with and duplicate it in the Finder. Working with a duplicate allows you to seriously mess everything up without affecting your original.
I’ll open up the “web” template for our project. If you’re not familiar with the way Keynote works, it’s very similar to Powerpoint, only it’s usually even more intuitive. Right away you should notice a strip of slides on the left side of the screen. This strip is divided into two areas: Slides (bottom) and Master Slides (top).
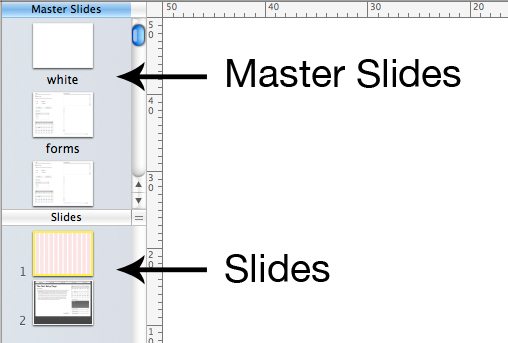
The Master Slides in the toolkit contain all of the pre-built elements, which means they’re essentially what you’re paying for. Each of the included Master Slides has a specific category that describes the UI elements within: forms, navigation, data, text styles, etc.
For the most part, you’ll leave the Master Slides alone and won’t change them directly. Instead, you’ll copy and paste elements from the Master Slides into the normal slides. This leaves your original template elements unchanged so you can reuse them again and again.
Of course, if you do want to make a global change that affects everything, you would edit an existing Master Slide or even create a new one. So for instance, if you wanted a reusable blue version of a button, you might duplicate the existing button in the Master Slide and change its color to blue.
Creating a New Slide
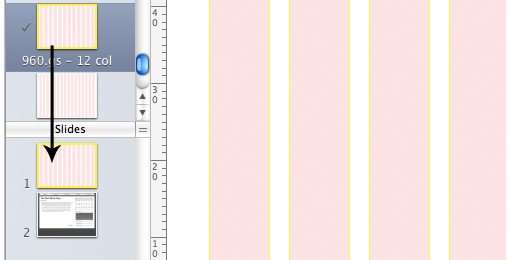
To get started, click on the current instructional aid under “Slides” and then hit Command+Shift+N to create a new slide. Next, we’re going to use one of the included 960.gs guide styles to get a general width for our content. To do this, drag a 960 Master Slide onto your normal slide, which will apply the Master Slide as a background.
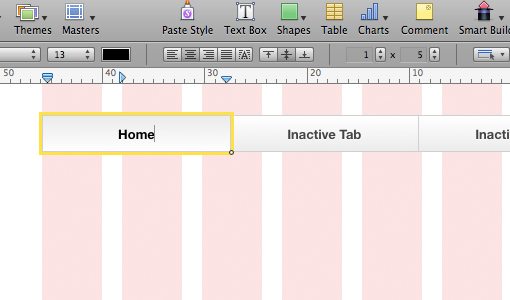
Add Some Navigation
We’ll start off with something just about every web page needs: navigation. If you check out the navigation Master Slide, you’ll find quite a few options. Find the one you like and simply copy/paste it to your slide. Bam, now we have navigation! See how easy that was?

As you can see, the navigation width is already set to match that of the guides we’ve chosen. Now that you’ve got the element in your slide, you can customize it however you want using Keynote’s rich tool set. Swap out the colors, change the text, it’s all up to you!
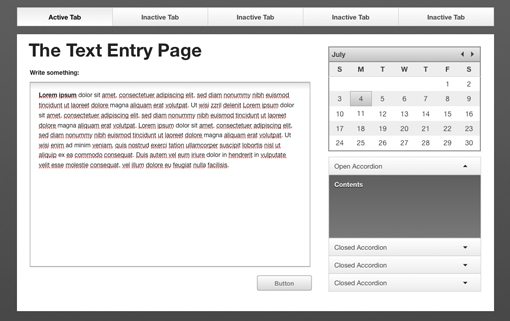
Use Keynote Tools to Add a Container
Now, remember that you’re not restricted to elements found in the toolkit. Keynote and Powerpoint both have basic drawing tools that can help a ton with your general structure. As an example, I fleshed out my page a bit by adding a background fill and drawing a simple box under the navigation as a container for the rest of the content.
Resizing Objects
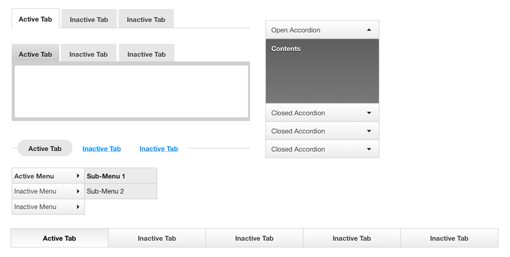
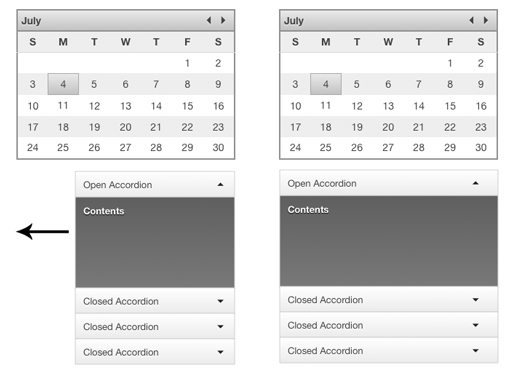
One of the things that I really appreciate about this toolkit is how well the objects are built for customization. For instance, let’s say I wanted to add a few widgets to my mockup, so I throw in a calendar and an accordion menu. The problem is, they’re not the same width, and for visual consistency, I would like them to be.
Looking at the accordion menu, you can see that it’s a complex object and instinctively think that stretching it horizontally is going to be a pain. Surely it’ll screw up all of those nested elements right? Wrong! All you have to do is stretch it the way you want and everything stays proportional and beautiful.
Finishing the Mockup
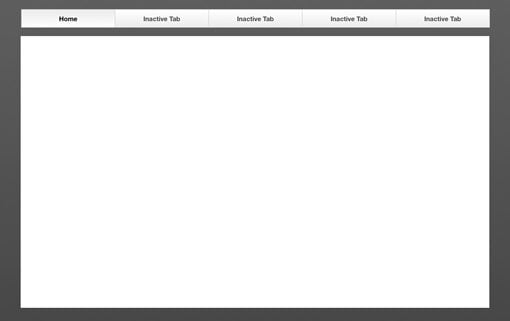
By now, you should have the basic process down. From here all you have to do is copy and paste the elements from the toolkit as needed. In no time at all, we have a great-looking mockup that could easily be used for the development of a CMS or blogging platform.
In all honesty, the very first time that I ever opened up the toolkit, I was able to figure out the process and create the layout above in around ten minutes! Now that I know what I’m doing I could do something similar in around three minutes. And I’m not really much of a Keynote user.
This really is a fantastic tool for creating quick wireframes and mockups. I could definitely make the image above in Photoshop, but it would have certainly taken me much longer to build those elements from scratch!
More Examples
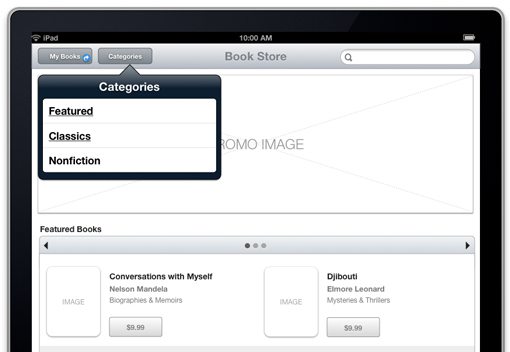
The demo above barely scrapes the surface not only of what you can do with this toolkit, but even what’s included. Check out these mockups of iPad and iPhone apps, built entirely with the Wireframe Toolkit for Keynote.
One thing to notice is that the buttons on these versions have been turned into links to other slides. That means you can actually run through a rough working prototype of the navigation by viewing the slideshow and clicking the buttons! How cool is that?
Who Is this For?
The Wireframe Toolkit for Keynote is useful to just about anyone involved with web or application development on any level. If you’re not a designer, it’s a great way to show your designer a general idea of what you’re looking for without being forced to resort to your MS Paint skills.
If you are a designer, it’s an awesome and incredibly fast way to think out the mechanics of a layout. You might think that the toolkit would restrict you, but it’s actually quite freeing to be able to bust out a wireframe so quickly before going into Photoshop or CSS and building the elements with the specific style you’re going for. In fact, if you don’t like the style of any of the elements, as we said above, they’re easy to change!
Great, Where can I Get It?
The Wireframe Toolkit for Keynote is available any time at Keynotekungfu.com for $12. Trust me, that’s really cheap for the amount of value you’re going to get out of this.
The website also has a bunch more information on what’s included and how to use it. There are even a couple of really great instructional videos containing useful tips on how to get the most out of Keynote for wireframing.