How to Export From Figma (To PDF, PNG + More)
Figma stands as a titan in digital design for its collaboration features and intuitive use. But when designers must share work across platforms or with various stakeholders, exporting designs to formats like PSD, PNG, and more becomes essential.
Let’s explore how to export your Figma designs to these popular formats. Whether you’re moving your design to Photoshop or sharing high-quality PNGs with clients, this guide will show you how to convert your work without losing design quality. Get ready to maximize the utility of your Figma projects.
Buckle up and get ready to unleash the full potential of your Figma creations!
Understanding Figma Exporting
Figma provides a range of export options, allowing you to choose the appropriate format and settings for your specific use case. Whether you’re exporting assets for development, sharing your designs with clients, or creating design documentation, Figma has you covered. Here’s a quick overview of the key aspects of exporting from Figma:
- File formats: Figma supports exporting in PNG, JPEG, SVG, and PDF formats, catering to various purposes and requirements.
- Export settings: Customize your exports by adjusting settings such as resolution, quality, and scale.
- Batch exporting: Export multiple objects or frames at once to save time and streamline your workflow.
- Exportable assets: Mark specific layers or components as exportable, making them easy to locate and export later.
Now that you have a basic understanding of Figma exporting, let’s dive into the process of exporting your designs.
Exporting from Figma
Follow these steps to export your designs from Figma:
1. Select the Objects or Frames to Export
Click on the object, layer, or frame you want to export in the canvas or the layers panel. To select multiple objects or frames, hold the Shift key and click on each item.
2. Open the Export Panel
With your desired objects or frames selected, open the Export panel by clicking the “Export” tab in the right-hand panel of the Figma interface.
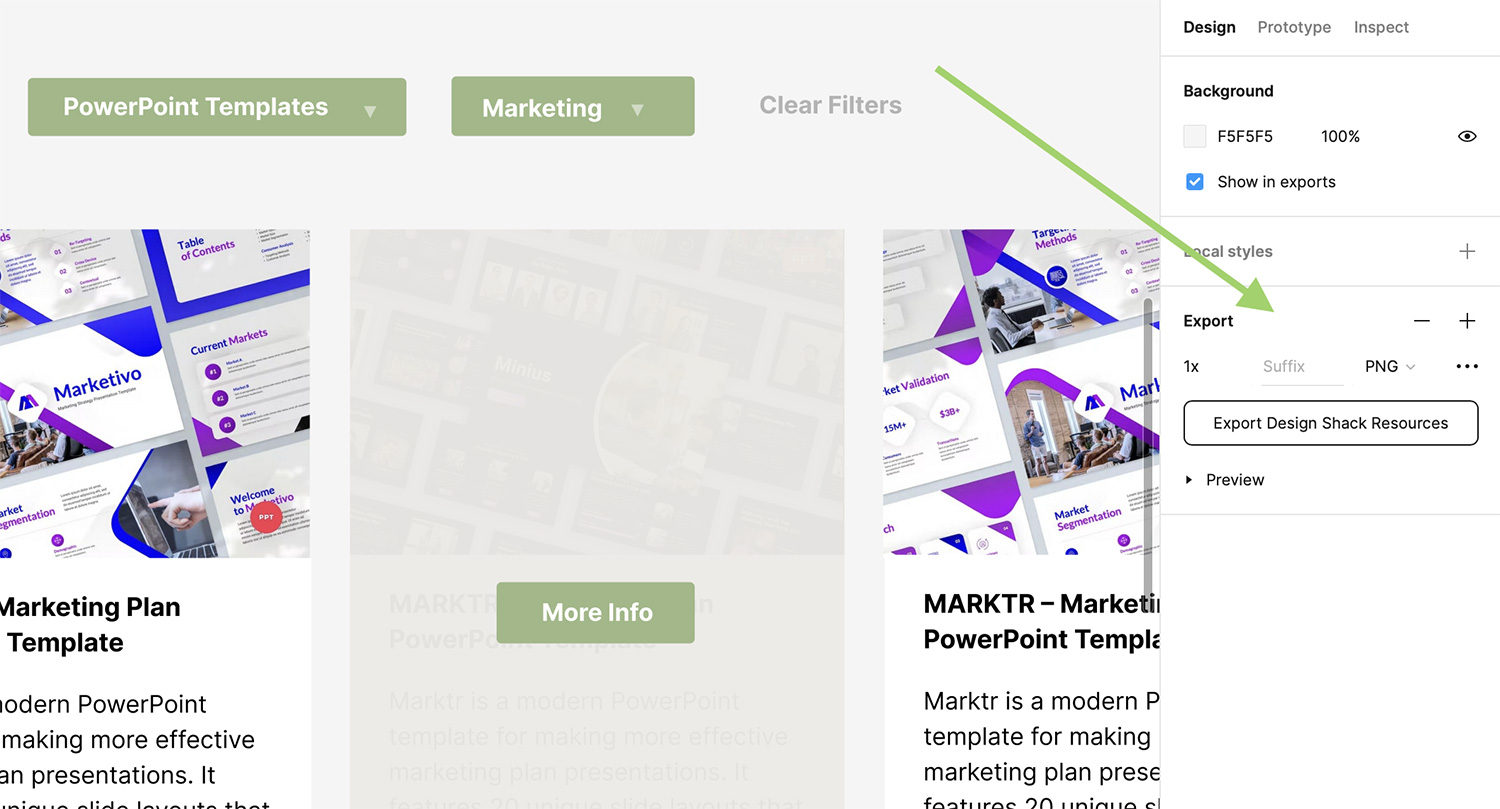
3. Choose the File Format and Settings
In the Export panel, click the “+” button to add an export setting. Choose the desired file format from the dropdown menu:
- PNG: A lossless, raster format suitable for most design assets and user interface elements.
- JPEG: A lossy, raster format best suited for photographs and images with gradients or complex colors.
- SVG: A vector format ideal for logos, icons, and illustrations, ensuring crisp results on any screen resolution.
- PDF: A versatile format perfect for sharing designs with clients, creating design documentation, or exporting multi-page designs.
Customize your export settings as needed:
- Scale: Adjust the export scale to create higher-resolution assets or smaller file sizes.
- Quality: For JPEG exports, set the image quality between 0-100 to balance file size and image quality.
- Include ‘id’ attribute: For SVG exports, choose whether to include the ‘id’ attribute for layers and groups.
- Outline text: For SVG and PDF exports, opt to outline text to ensure accurate rendering of fonts, even if the viewer doesn’t have the font installed.
4. Export Your Designs
Click the “Export” button next to your chosen export settings to save your designs in the specified format and location. You can also click the ellipsis icon (…) next to the Export button to access additional export options, such as exporting all assets at once, exporting only the selected format, or exporting to a specific folder.
Tips for Exporting from Figma
To make the most of Figma’s exporting features, keep these tips in mind:
- Choose the right file format: Select the appropriate file format based on your needs, ensuring the best balance between image quality and file size.
- Mark assets as exportable: If you have specific layers or components that you’ll need to export regularly, mark them as exportable in the Design panel. This makes it easy to locate and export these assets later.
- Use slices for precise exports: Create slices to define the exact area of your design you want to export, ensuring you get the perfect result every time.
- Optimize your SVG exports: When exporting SVGs, consider optimizing them using tools like SVGO or SVGOMG to reduce file size and improve performance.
- Collaborate with developers: Share your Figma files with developers and grant them access to export assets directly, simplifying the handoff process and ensuring everyone stays aligned.
By following these steps and tips, you can efficiently export your designs from Figma in various file formats to suit your specific requirements. Figma’s powerful and user-friendly exporting features make it an ideal choice for designers looking to streamline their workflows and effectively collaborate with clients and teammates.