Mastering Photoshop History and Layer Comps
Sometimes the key to moving ahead in Photoshop is to look back.
There are a number of different tools, features and methods in Photoshop that you can and should be using to track and manipulate the history of your designs as they progress.
Today we’ll take an in-depth look at the Photoshop history palette and how it can help you diversify your designs and keep track of various ideas. We’ll also learn how to use the History Brush and those incredibly handy but difficult to figure out Layer Comps.
2 Million+ Digital Assets, With Unlimited Downloads
Get unlimited downloads of 2 million+ design resources, themes, templates, photos, graphics and more. Envato Elements starts at $16 per month, and is the best creative subscription we've ever seen.


The History Palette
We’ll start off with a super basic introduction to the history palette. Most of you probably know exactly how this works but we’ll examine it anyway just to be sure everyone understands Photoshop history to its fullest.
To find your history palette, click on “Window” in the menu and then go to “History.” This should bring up the palette shown below.
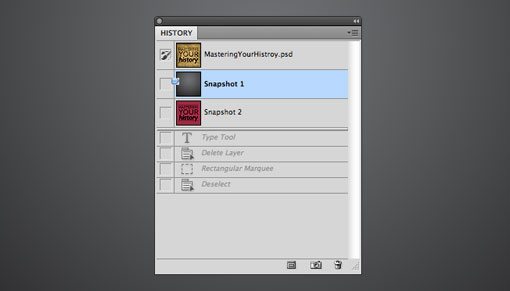
As you work on a Photoshop document, this palette should automatically generate a list of actions. Obviously, this palette is tracking the history of your work, meaning every time you do something in Photoshop, the action is recorded.
The functionality here is similar to a glorified “Undo.” With a detailed record of your actions in place you can easily backtrack to any step by clicking on it. So if you type some text, perform a bunch of styling on the text, then decide you want to revert to plain text, you can just scan through your history and click on the step right before you began applying styles.
Duplicating Your Document
On the bottom of the history palette is a strip of buttons. The first of these is an incredibly handy tool that duplicates the frontmost document in its current state.
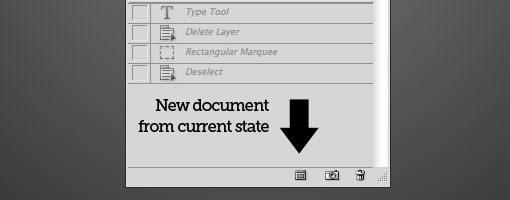
As I tend to pursue multiple different ideas simultaneously while designing, I use this command all the time. This is also perfect for creating multiple different versions of a file. For instance, you could create a button graphic for the web, save it, duplicate your document, manipulate the graphic to create a hover state and then save the second version as a separate file.
We’ll be going over multiple ways to track different versions of a design but none of them are as safe and reliable as simply duplicating your document and saving an alternate version. The downside of course is keeping track of multiple files and the additional storage necessary to store the different versions. Another drawback is that the new document created by this button is void of history so you can’t go back from that initial state if you need to.
Snapshots
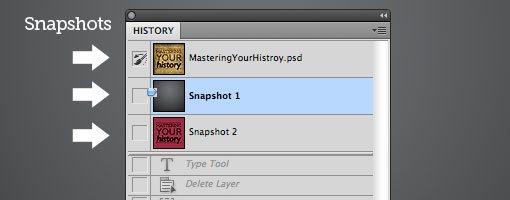
The second button (the camera icon) allows you to save a snapshot of your Photoshop document in its current state. Snapshots are a very powerful tool that you should absolutely be using on just about everything you work on in Photoshop.

Just like the button that creates a duplicate document, a snapshot allows you to save a copy of your Photoshop document in its current state. All of your layer info, styles, etc. remain in tact and fully editable within the snapshot.
It’s different than the first button in that these versions are actually contained in your current document. Every time you take a snapshot it is stored at the top of the history palette. Clicking on a snapshot will bring you immediately to the state the document was in when you saved the snapshot.
The reason that snapshots are an absolute must is that they provide a much easier method of reaching a specific previous state than rifling through a list of history items. Further, remember that your history will only go back so many steps. In Photoshop preferences you can set how many history states you want to track and once this limit has been reached, old states are deleted in favor of new states. This means that frequently a snapshot will be the only way to access a previous point in your document’s history.
Before you rush into using snapshots there are a few things you should know about how they work. First, when you click on a previously saved snapshot and begin to edit your document, that snapshot will not automatically be updated. This means if you make changes that you want to keep, another snapshot will be necessary.
Even more importantly, always remember that snapshots are not saved with your document. If you have three snapshots of three different versions of your file that you want to keep and you simply save and close your document, those alternate versions are gone forever.
Snapshots are merely for experimenting within a given editing session and are not a long-term versioning solution. Later in this article we’ll take a look at layer comps, a different tool that is better for saving versions within a file.
History Options
If you click the little dropdown menu at the top right of the history palette you should find a menu item labeled “History Options.” Open this up to reveal the settings below.
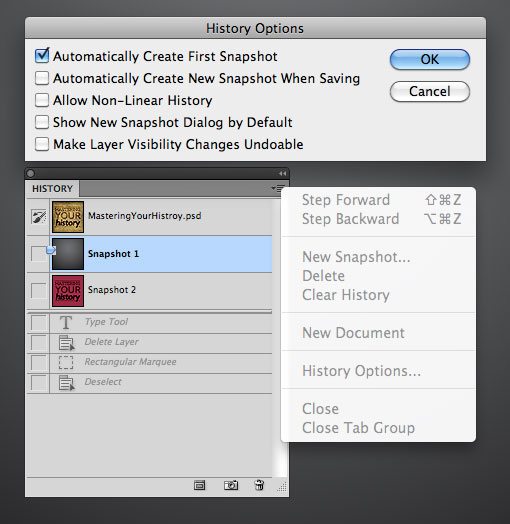
The first option here is the only one activated by default. This makes it so that whenever you open or create a document, the initial state is automatically saved as a snapshot. I highly recommend leaving this option selected so that you always have an easy way to quickly revert to the original design.
The next option tells Photoshop to take a snapshot every single time you save. Whether or not you should check this highly depends on your own workflow. I preach and practice saving as often as you think about it so this option quickly becomes annoying as my history palette fills up with fifty snapshots.
The next option activates non-linear history. This is hard to grasp at first but essentially it allows you to maintain access to history steps even if you go back before them and start making changes. By default if you go back in the history, then make a change, all of the steps past that point are deleted. With non-linear history they will remain despite the fact that they aren’t really affecting the current document state.
The final two options are for showing the new snapshot dialog and tracking layer opacity. If you option-click on the snapshot button you can access the snapshot dialog without activating this option. This essentially allows you to name the snapshot and set the scope (full document, current layer, merged layers).
Finally, Photoshop doesn’t see changing the layer opacity as a change significant enough to be tracked through the history palette. If you disagree, simply click the last checkbox in the options palette.
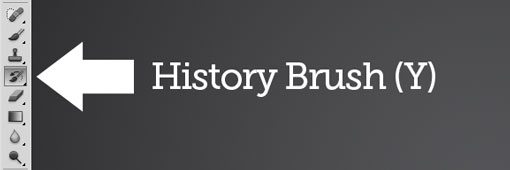
The History Brush
The History Brush is found directly under the Clone Stamp and is accessible via the “Y” key. Make sure you don’t grab the Art History Brush, that’s something else entirely and is purely for creating an artsy grandma look.
I rarely use the History Brush simply because it doesn’t accomplish anything that you can’t do better with a little masking, but it’s a fun tool and you should at least know how to use it.
Basically, the History brush allows you to paint in previous states of your document. You can do this using any and all history states but it’s easiest when used in conjunction with snapshots.
To illustrate, let’s create an example. First open up any image. I grabbed something random from Flickr. Here’s the image:
Duplicate the background layer, create a snapshot and call it “Original”. Then apply a fun filter (I chose Ocean Ripple).

Now create another snapshot and call it “Ripple.” Then click on the “Original” snapshot so that your document is back to where you began. Finally, click the little box next to the “Rippled” history state so that the little History Brush icon appears.

You now have one history state selected and another set as your target for the History Brush. When you click and drag with the History Brush, the target state will be gradually painted into the original state.

Pretty cool no? That’s really the only thing this brush does. Keep in mind that you can use any type of brush that you want here: hard, soft, scattered, etc. With a little creativity you can easily come up with some awesome results.
Layer Comps
The final tool we’ll be looking at is Layer Comps. These can be quite tricky to get the hang of but are extremely useful once you figure out how they work.
The first thing we’ll want to do is create two distinct ideas for a hypothetical design. Grabbing another image from Flickr, I created the snowy scene below.

Next I decided to experiment with some different fonts and came up with the following alternate version.

The key to utilizing layer comps is to, for the most part, utilize separate layers. Layer comps track a very limited number of variables so you can’t count on them to keep track of font changes and other complicated changes. Instead, Layer Comps can be used to save the visibility and position of a set of layers.
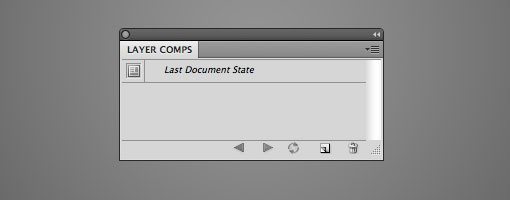
Now go to Window>Layer Comps to bring up the palette. This palette is similar to the History palette in that it contains a list of document states. A big difference is that these states are only created manually (similar to snapshots).
So the first thing I want to do is activate all my layers that correspond to my first design idea. Once these are on, I click the New Layer Comp button and bring up the following dialog.
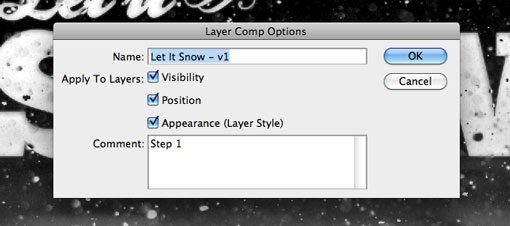
Here you can name the Layer Comp, set options for tracking visibility, position and layer style, and add comments to help you remember what the Layer Comp contains. Hit OK to save the comp.
Now go into the layers palette and activate the layers necessary for the second design idea and repeat the steps above to create another layer comp. Now you should have the two versions saved into separate comps. If at any time you want to split your comps into separate documents, just go to File>Scripts>Layer Comps to Files.
To learn more about how Layer Comps work, let’s go over some basic functionality.
Changing and Updating Comps
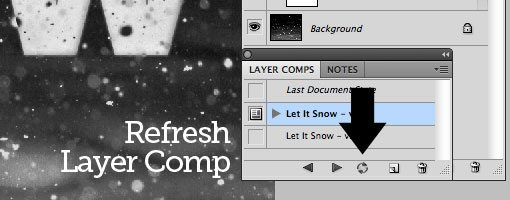
To switch Layer Comps, simply hit the button to the left of the comp. This should change your configuration automatically to that of the state that you previously saved.

With a layer comp selected, you can make as many changes as you want. To save these changes into the comp, hit the little button that looks like two rotating arrows. This will refresh the comp and add in any recent layer changes.
The ability to update comps makes this an invaluable tool for keeping track of different ideas and designs you have going in a given document. You can easily come back later, work on your ideas, and then update the comps for easy access.
Another great thing about layer comps is that they will in fact save with your document. Using comps is a great way to manage different iterations inside of your document on a long-term basis.
Reusing Layers
Though it makes things complicated, you can in fact use utilize manipulated versions of a single layer across multiple comps. For instance, in the snow example, the little swirly type embellishment to the right of the first line is actually the same exact layer in both comps, it has just been repositioned in the second version (and another was added).
You really have to be careful when you start mixing layers between comps and changing their attributes, things can get messy fast and leave you with an nearly unsalvageable document.
The key to figuring it all out is to continually switch back and forth between your layer comps as you change the layers around to see what is and isn’t being saved.
Conclusion
Putting the information above into practice will immediately encourage you to put more effort into experimenting with different design ideas. Many designers are hesitant to mess with a design they already like and it’s quite comforting to know you can always go back with a single click.
Leave a comment below and let us know how you pursue different paths in Photoshop. Do you use multiple documents, snapshots, layer comps or all of the above?
Sharing is awesome. Paste this handy snippet into Twitter or Facebook to share the article with your friends:
Mastering Photoshop History and Layer Comps http://ow.ly/2C0Gh