Build a Fun Trivia Game With the CSS Active Selector
We’ve done a ton of fun stuff recently with the :hover selector. From button hover effects for beginners to more advanced hover tutorials and even onto using hovers with multiple backgrounds. Today we’re moving on and learning about a related but equally awesome selector that often gets overlooked.
With :active, we can control the state of an object while it’s being clicked. Typically, this takes the simple form of changing a link’s color while the mouse is pressed down, but we’re going to do something much more interesting. Follow along as we build a super cool, pure CSS presidential trivia game.
What We’re Building
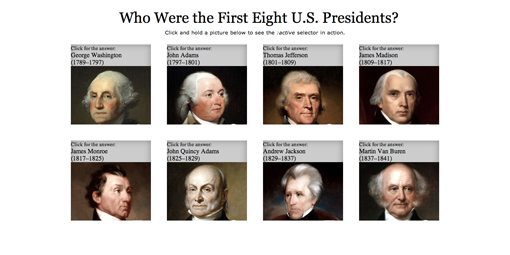
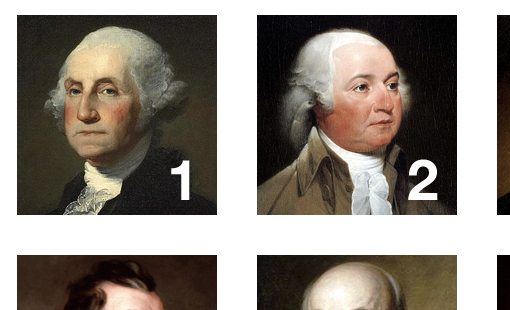
The basic idea here is pretty simple. We have a grid of eight pictures with the goal of identifying the men depicted, each of which is a former U.S. president. Hovering over an image slides it down a bit to reveal further instruction, which encourages you to click. Clicking and holding will slide the image down further to reveal the name of the president shown.

Demo: Click here to launch the live version
Download: Click here to download the source files
Pseudo-class Selectors
A pseudo-class selector is something that we can use in CSS to modify a basic selector. If this sounds too technical for your liking, don’t worry, you already use these without even knowing it! The one that you’re likely to be most familiar with is the :hover pseudo-class selector, which allows you to change the appearance of something on hover. You might also be familiar with fancier pseudo-class selectors such as :first-child.
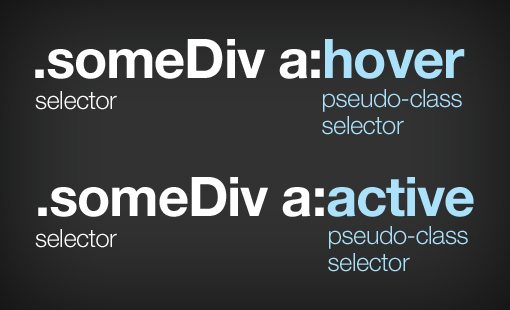
Regarding links or anchors, there are four of these pseudo-class selectors that you should be familiar with. Here they are with explanations for their use:
:link {} /*non-clicked links*/
:hover {} /*currently in a mouse-over state*/
:active {} /*currently being clicked*/
:visited {} /*clicked links*/
As you can see, our often used hover selector is part of a nice little family that can govern the style of a link at pretty much every state of its existence. It’s important to note though that this would be a much more interesting set of tools if :visited weren’t so problematic. Due to security hassles, browsers actually limit what you can do with this pseudo-class. For instance, you can use it change the color of a link, but you can’t manipulate that link’s background image.
For this reason, we turn to :active if we want to do anything really fun with a pure CSS click event. It’s not intuitive to click and hold though so you should tread carefully when using this functionality and always be sure to clearly instruct the user.
Enough of the boring stuff, let’s get started on our project!
The HTML
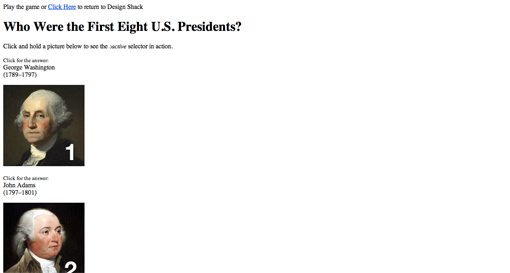
The HTML for our project is pretty simple. We start off with a brief introduction that states what the game is and how to play it. Here we ask a simple question: “Who Were the First Eight U.S. Presidents?” Notice that all of this is thrown into a simple container div.
Next, we create a reusable module to hold our image, which serves as a sort of visual question, and the answer, a simple paragraph that hides below the image. The concept of being reusable is key here. We want to repeat this for seven other presidents and we obviously don’t want to go through the pain of styling each module individually. For this reason, we apply a class (president), which we can style once and have those styles affect everything that the class is applied to.
<div class="container">

    <h1>Who Were the First Eight U.S. Presidents?</h1>
    <p>Click and hold a picture below to see the <em>:active</em> selector in action.</p>

    <div class="president">
    	<p><small>Click for the answer:</small><br /> George Washington <br />(1789–1797)</p>
    	<a><img src="pres1.jpg" alt="" /></a>
    </div>

</div>
There are a few things to note about the structure of the president div. First, I’ve got a little bit of voodoo going on with the paragraph. First of all, I’ve broken the information up into three sections: instruction, name and presidential term. Each piece is put on its own line via a break tag. The initial line uses a small tag, which will serve as an easy way to add a bit of visual differentiation to our text so it’s not monotonous.
Next up is the image, which is wrapped in an anchor tag. Notice though that I don’t have a link. This is because our anchor doesn’t serve as a gateway to another page but simply a clickable object. One important side effect here is that anchors don’t activate a special hover cursor without an “href”, which means we’ll have to do this manually.
All Eight Presidents
Now that we’ve got our basic HTML structure in place, copy and paste the president div until you have eight of them. Then enter the appropriate information for the other presidents.
<div class="president">
	<p><small>Click for the answer:</small><br /> George Washington <br />(1789–1797)</p>
	<a><img src="pres1.jpg" alt="" /></a>
</div>

<div class="president">
	<p><small>Click for the answer:</small><br /> John Adams <br />(1797–1801)</p>
	<a><img src="pres2.jpg" alt="" /></a>
</div>

<div class="president">
	<p><small>Click for the answer:</small><br /> Thomas Jefferson <br />(1801–1809)</p>
	<a><img src="pres3.jpg" alt="" /></a>
</div>

<div class="president">
	<p><small>Click for the answer:</small><br /> James Madison <br />(1809–1817)</p>
	<a><img src="pres4.jpg" alt="" /></a>
</div>

<div class="president">
	<p><small>Click for the answer:</small><br /> James Monroe <br />(1817–1825)</p>
	<a><img src="pres5.jpg" alt="" /></a>
</div>

<div class="president">
	<p><small>Click for the answer:</small><br /> John Quincy Adams <br />(1825–1829)</p>
	<a><img src="pres6.jpg" alt="" /></a>
</div>

<div class="president">
	<p><small>Click for the answer:</small><br /> Andrew Jackson <br />(1829–1837)</p>
	<a><img src="pres7.jpg" alt="" /></a>
</div>

<div class="president">
	<p><small>Click for the answer:</small><br /> Martin Van Buren <br />(1837–1841)</p>
	<a><img src="pres8.jpg" alt="" /></a>
</div>
Progress Check
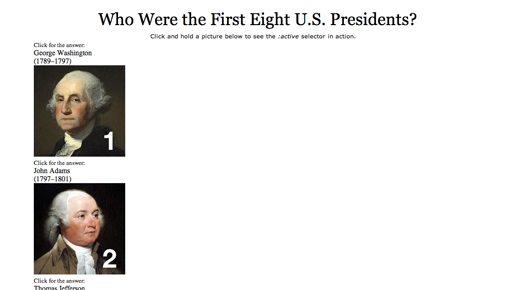
At this point, we have pretty much all of the HTML that we’re going to need. However, since we haven’t styled anything, your live preview should still look pretty rough. You can see everything starting to take shape though, specifically notice that our small tags are already working perfectly.
Starter CSS
Now it’s time to add some style to our quiz. We’ll start by defining the easy stuff: the container dimensions and instructional typography. We’ll toss on a generic container size of 960px and add in a margin of “20px auto” to center the div horizontally and bring it down from the top a little.
We also need to make the h1 and p tags look good so we toss in some basic font styling. I got a little fancy here and used the CSS child selector (.container > p) to target only paragraphs that are direct descendants of the container. This will ignore the paragraph tags nestled into our president divs.
.container {
	width: 960px;
	margin: 20px auto;
}

h1 {
	margin-left: 20px;
	font: 37px/1.5 Georgia, Times, serif;
	text-align: center;
}

.container > p {
	text-align: center;
	font: 13px/1.5 Verdana, Helvetica, sans-serif;
}
Progress Check
Now you should have some nice margins that move the content away from the edge and a pretty headline that no longer uses the default typographic styling.
Style the President Class
Now we’re going to start adding some style to the president class, which should make a huge difference in our layout. To start, we want to float them all to the left and set their dimensions. Since we’ll be sliding the images in and out, we set the overflow to hidden so nothing breaks out of our little 200px by 200px box.
Next we set the margin to 20px, this is not an arbitrary number. It’s the carefully calculated value that allows four images per row in our layout. Our width is 960px, which is divided up between four 200px wide images, but 4*200 equals 800, leaving 160 pixels left for margins. 160px/4 images is 40px of margin per image, 20 on the left and 20 on the right.
.president {
	float: left;
	height: 200px;
	width: 200px;
	overflow: hidden;
	margin: 20px;
	background: none; /*IE*/
	background-color: rgba(0, 0, 0, .2);
	cursor:pointer;

	/*CSS3 Fancy Inset Shadow*/
	-webkit-box-shadow: inset 0 0 20px rgba(0, 0, 0, .3);
	-moz-box-shadow: inset 0 0 20px rgba(0, 0, 0, .3);
	box-shadow: inset 0 0 20px rgba(0, 0, 0, .3);

}
There are some other points of interest here as well. We’ll be adding some z-index voodoo later, which actually makes any background color cover up our answer text. To account for this, I used an RGBa background fill at 20%. Older versions of IE don’t like this so they simply get no background fill.
I also set the cursor to “pointer” which will make the little hand appear when we hover over a president. Finally, I added an inset shadow just to make our background look a little nicer. This part is completely optional.
Progress Check
At this point things are looking a little weird, but we’re on the right path. Our president images are being contained and clipped, which is good, but the background text is actually pushing them down, which we don’t want. Instead we want the image to float over the text. We’ll accomplish this in the next step.
Fix the Text Styles and Stacking Order
Before we proceed to making all of this work, let’s style our paragraph text real quick. If we wait any longer it will be hidden behind the images and harder to keep an eye on.
.president p {
	font: bold 13px/1.5 Verdana, Helvetica, sans-serif;
	margin: 4px 0 0 10px;
	width: 190px;
}

.president p small {
	font: 10px/1.5 Verdana, Helvetica, sans-serif;
}
These styles should make all our text look much better. Notice that even though the small tag has default styling, it can and should be easily overridden in a manual fashion.

Putting the Text Behind the Images
As I mentioned above, we don’t want our paragraphs to push down the image but instead hide behind it. To accomplish this we set it free from the flow from with absolute positioning and then move it behind the image with a z-index of -1.
.president p {
	position: absolute;
	z-index: -1;
	margin: 4px 0 0 10px;
	width: 190px;
	font: bold 13px/1.5 Verdana, Helvetica, sans-serif;
}

.president p small {
	font: 10px/1.5 Verdana, Helvetica, sans-serif;
}
This gets everything right where we want it. The text is hiding behind the image and each image is finally being shown in its full form. The problem? There’s no way to see the answer!
Bring It to Life
Now that we’ve got everything right where we want it, it’s time to add the interaction. Let’s think about how we want it to work: We’ve already got the default state coded so we’re good there. The next step is the hover event. This should bump down the image, but only a little, just enough to show the first line of text. Then on the click, we want to bring the image down even further.
This all needs to happen with some nice transitions of course so it turns out that our first step is to set these up on the images. As always, we need a million different versions to account for all of the various browsers:
a img {
	-webkit-transition: margin 0.3s ease;
	-moz-transition: margin 0.3s ease;
	-o-transition: margin 0.3s ease;
	-ms-transition: margin 0.3s ease;
	transition: margin 0.3s ease;
}
With these transitions in place, any time we change the margins on our images, the transition will be animated. So our next step is to define the hover event with our favorite pseudo-class selector.
a:hover img {
	margin-top: 20px;
}
This adds a little bit of margin to the top of our image so that when the user hovers over it, this is what they’ll see:
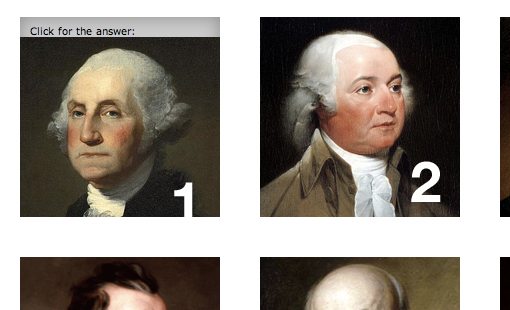
This serves as a nice little tip for how to get the answer. If we showed the full answer here, we would likely have an issue with accidental reveals, the click serves as a more concrete way to ensure intentionality.
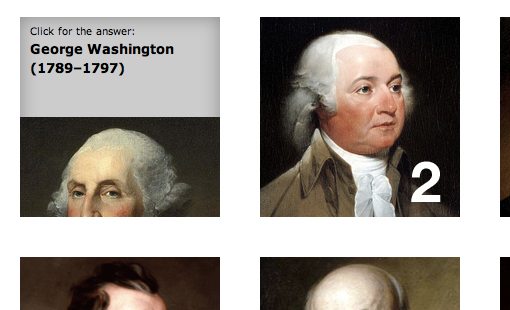
Our final piece of CSS is what we came here to learn about: the active pseudo class selector. By implementing this small but powerful final piece, our entire trivia game comes together.
a:active img {
	margin-top: 100px;
}
Now when a user clicks on an image and holds the button down, the image of the president slides down and his name is revealed. With that, we’re all finished!
Conclusion
After reading through this tutorial you should know a ton of great stuff about some of the most popular pseudo class selectors and how to use them to come up with some really interesting results. We combined the hover and active selectors to create a pure CSS trivia game where the user first hovers and then clicks to see a hidden message.
Leave a comment below and let us know if you learned anything. Also be sure to check out the live demo. Can you name all eight presidents successfully?